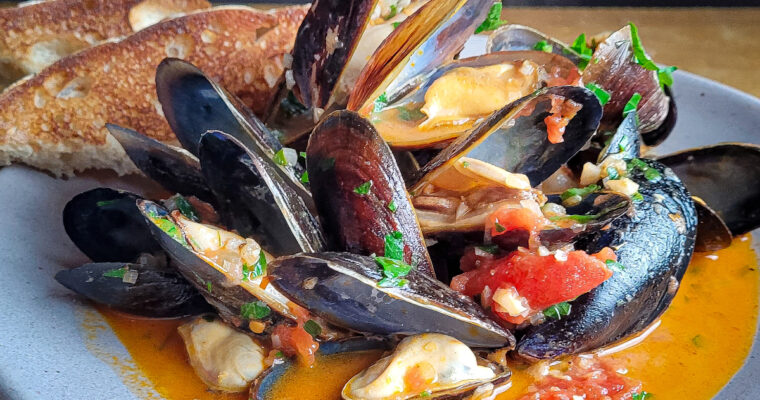
My first official job as a cook was at a small restaurant in the suburbs of Washington DC called Addie’s. One of the dishes I will never forget cooking there was a simple bowl of mussels prepared with lots of garlic, shallot, tomato, butter, lemon, …
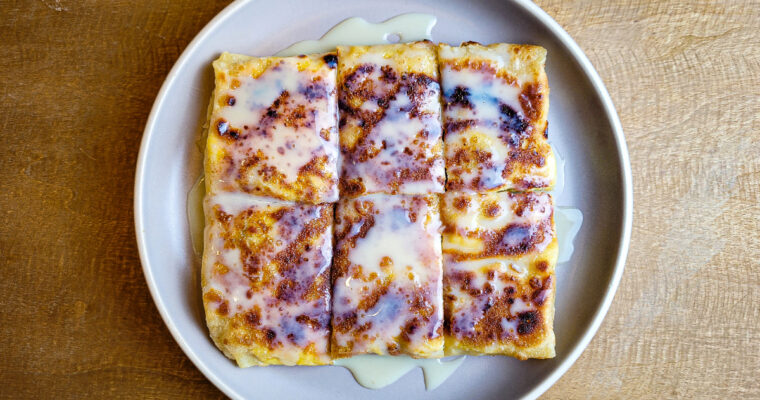
This mushroom tart recipe is great for entertaining guests. It can be served warm or at room temperature, and it can easily be reheated in the oven. The great thing about this recipe is that it uses store-bought puff pastry. Sure, you could try to …
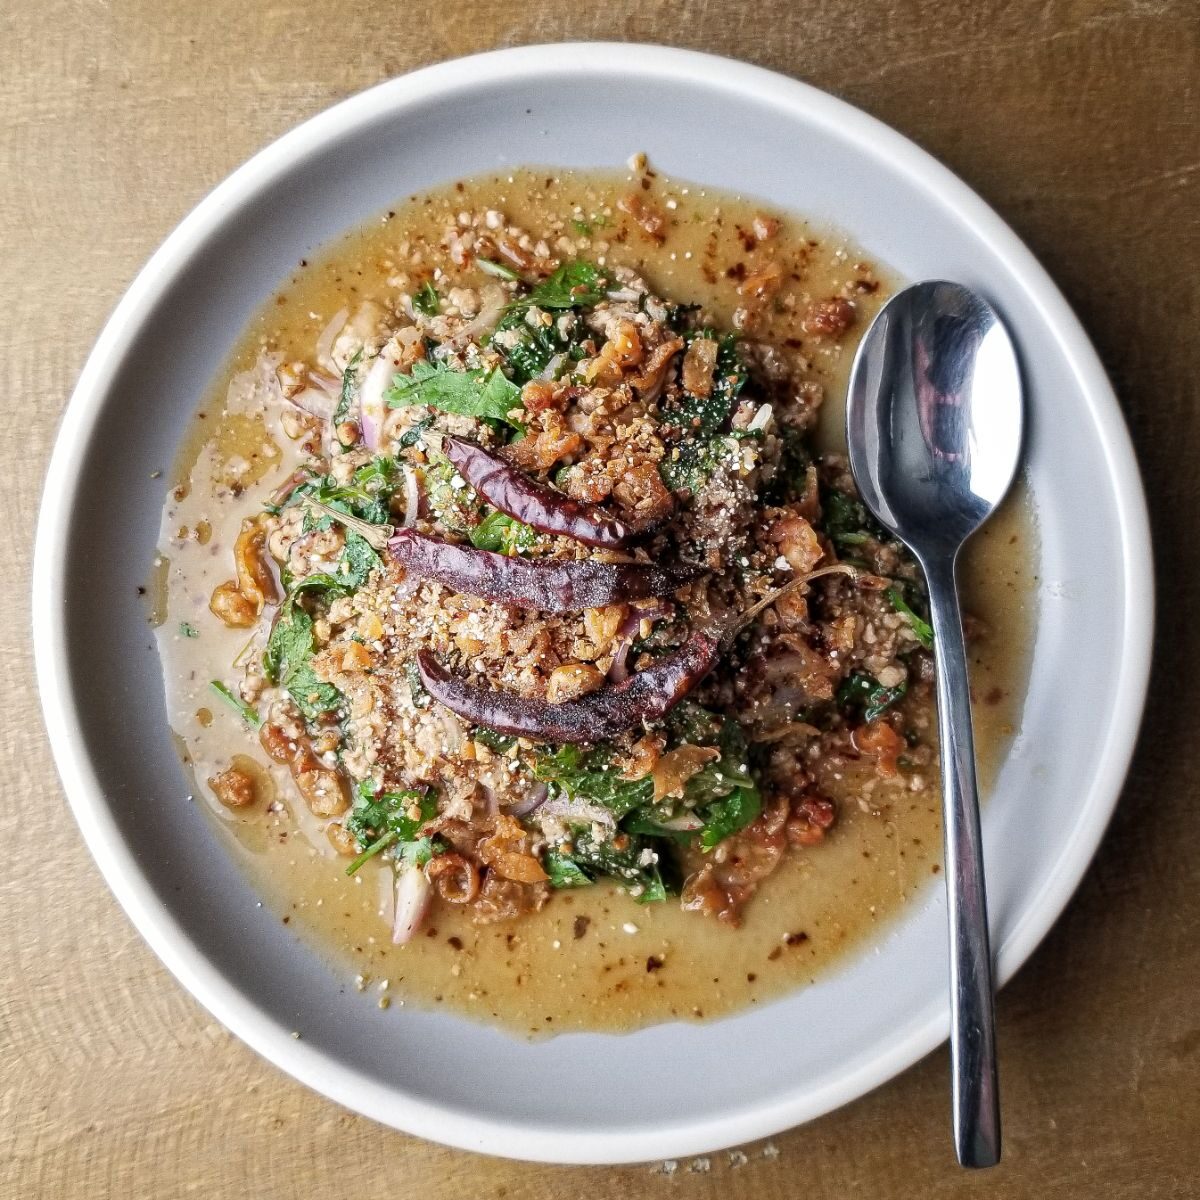
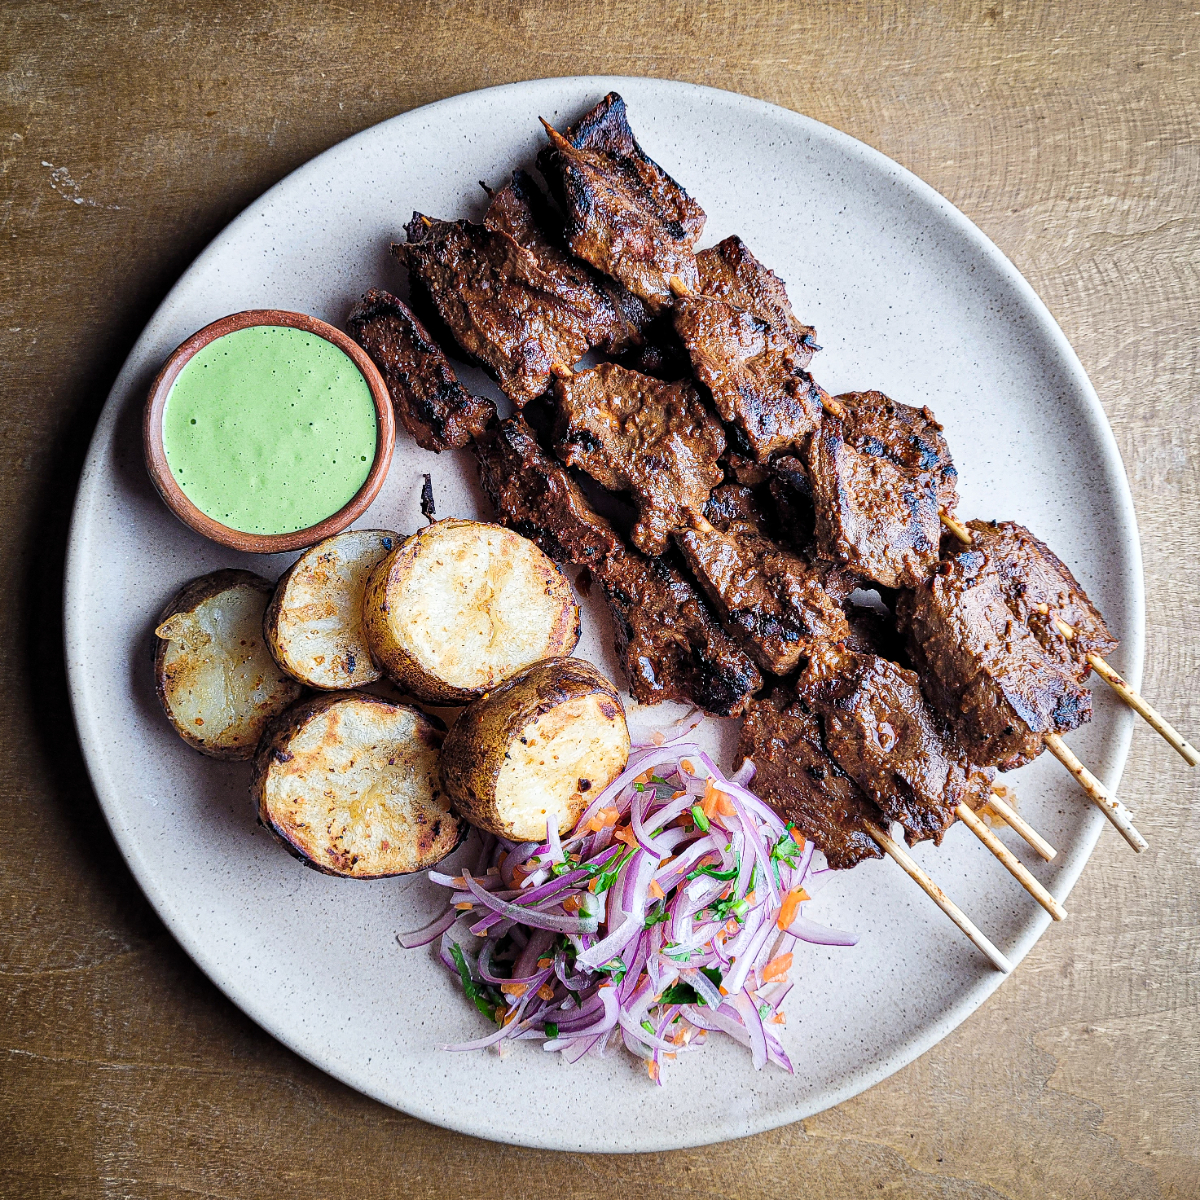
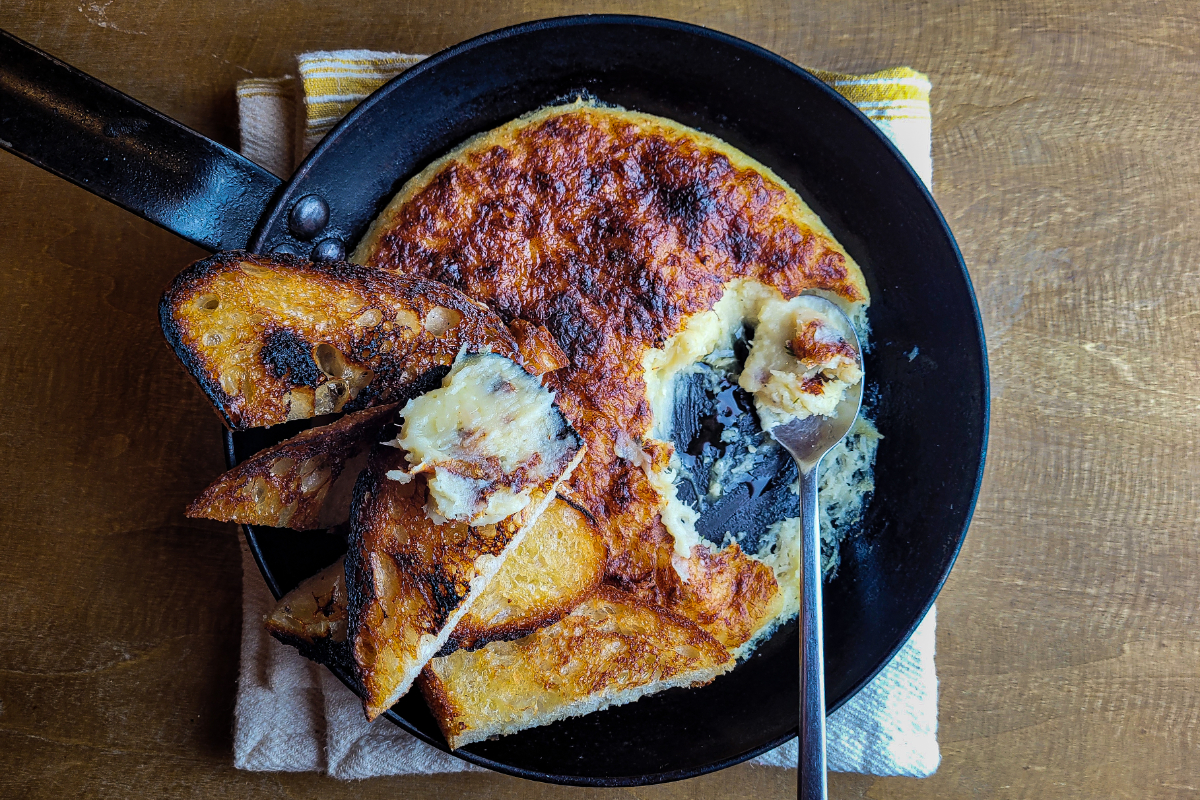
If you have never tasted grilled beef heart, chances are you may be a bit apprehensive at first. Most organ meat typically has a flavor and texture that is quite different from typical beef muscle (steak). Some organs such as the liver may have a strong, irony flavor. Fortunately, one could easily be tricked into thinking they were eating a regular piece of grilled “steak” when they are served Anticuchos. I am personally guilty of serving anticuchos to friends without telling them it is beef heart. They are always surprised by how delicious it is.
“Anticuchos” are a Peruvian dish of marinated chunks of beef heart that are skewed and grilled, similar to shish kebabs. They are often served with some potatoes, maybe some corn, and a sauce or two to accompany. They are typically eaten as a snack or as an appetizer and can be found in restaurants and street carts throughout Peru. In this recipe I will show you how to make some grilled potatoes, as well as two delicous sauces/condiments to accompany the anticuchos.
Grilling the anticuchos.
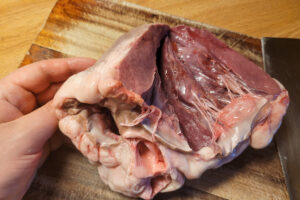
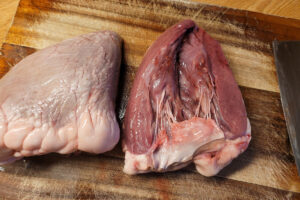
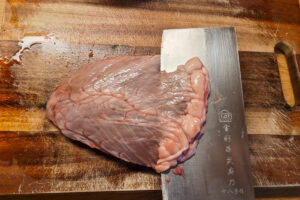
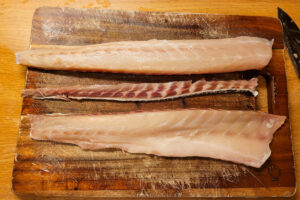
Beef Heart?
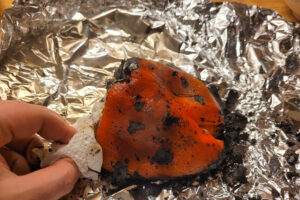
Anticuchos are traditionally made with beef heart and if you can find some, I highly recommend you try it. If you cannot find beef heart, any other steak cut will work very well in this recipe. Ask your butcher if they have beef hearts available. They usually keep them frozen which is perfect. They are sometimes already cut into halves or quarters but I will explain how to process the heart if you get it whole.
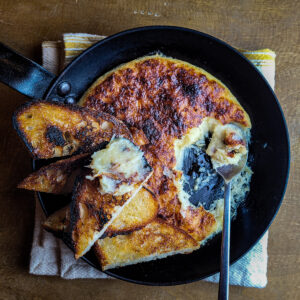
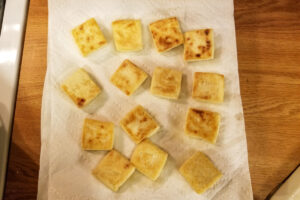
Once you have cleaned up the beef hearts, they are not so scary.
1dry ancho chili, stems and seeds removedabout 10 grams
1tspkosher salt4 grams
To serve
2russet potatoes
neutral oil, salt, and chili powder or black pepper
Instructions
Green Sauce
Place all of the ingredients into a blender and blend until smooth.
Adjust seasoning with more salt and lime juice if necessary. Sauce should be very well seasoned and very bright in flavor. This will make more sauce than you need for this recipe but it goes well on almost everything. It will keep for up to a week in the fridge.
Salsa Criolla
Place all of the ingredients in a mixing bowl and toss together. Refrigerate until ready to serve.
Anticuchos
If the beef heart is frozen, thaw overnight in the refrigerator or under cool running water until thawed.
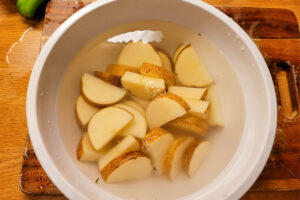
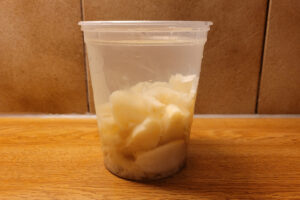
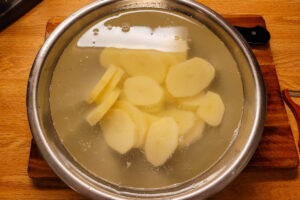
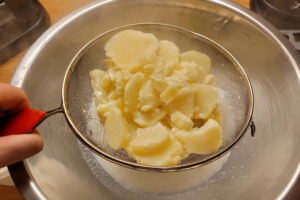
Steam or gently simmer the whole, unpeeled russet potatoes until completely cooked. You can check if the potato is done if a skewer easily punctures the whole potato. This will take 1- 1.5 hours. I prefer steaming because the potatoes are less likely to break apart. When the potatoes are done cooking, allow the potatoes to cool in the fridge for at least 1 hour or up to overnight.
Soak the ancho chili in boiling water for 10 minutes.
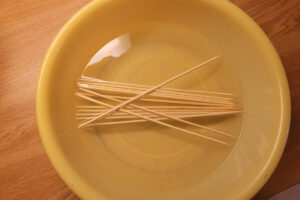
Soak 6-10 wooden skewers in water for at least 30 minutes, keep them soaking until you are ready to skewer the meat.
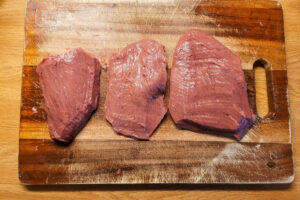
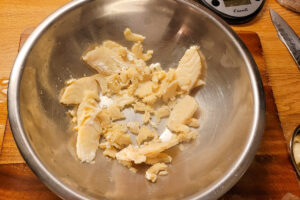
Note that there are 2 openings (ventricles) in each heart. Try to cut the heart in 3 flat pieces. Two pieces from either side of the heart, and one piece that is the muscle in between the two ventricles. If you have trouble, don't worry because you will be cutting the heart into small chunks anyways.
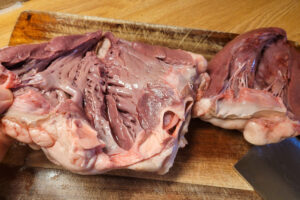
Here I have removed one side of the heart.
Here I am separating the other side of the heart from the muscle in between the two ventricles.
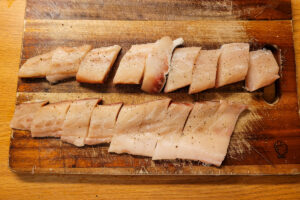
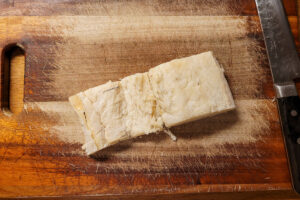
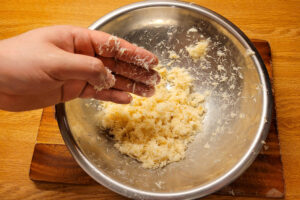
Take each piece of heart (it doesn't matter how many pieces you ended up with), and use a sharp knife to "shave" away the gnarly-looking, veiny, inner part of the heart.
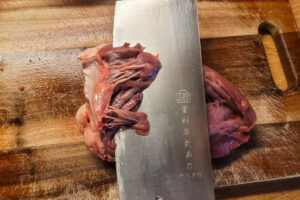
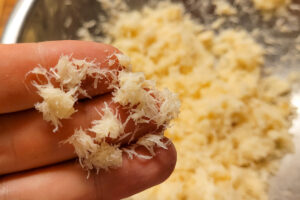
The heart should look like smooth muscle when you are done.
flip the heart over and cut away any fat on the outside of the heart. If you can carefully peel away the very outer membrane of the heart, awesome. If not, no big deal.
Repeat this process with the rest of the pieces of heart until they look like clean pieces of meat.
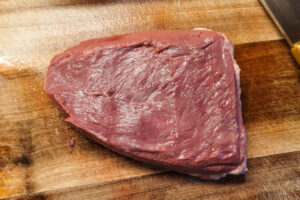
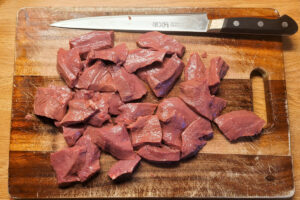
Cut the beef heart into chunks that are roughly 1.5 inches long and wide but no more than 1/2 inch thick. Set the heart pieces aside in a mixing bowl.
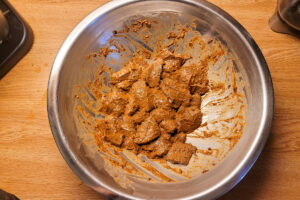
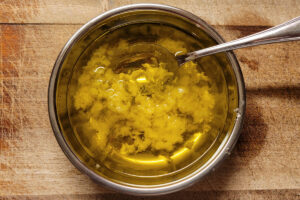
Remove the ancho chili from the water it was soaking in (discard the soaking water) and place it into the blender with all of the rest of the ingredients listed under "anticuchos" above (not including the heart, obviously). Blend very well.
Pour the contents of the blender onto the chunks of beef heart and mix well. Cover with plastic wrap and marinate in the refrigerator for a minimum of 3 hours, or up to overnight.
To Serve
Get a grill hot. Alternatively you could cook the anticuchos in a hot griddle or cast iron pan
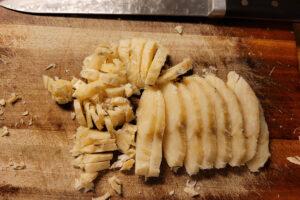
Cut the cooled potatoes into 1 inch thick rounds.
Season both sides of the potato rounds generously with salt and chili powder (or black pepper). Rub the potatoes generously with neutral oil. Set aside
Skewer the pieces of marinated beef heart onto the soaked wooden skewers.
Grill the potatoes over medium heat for about 4 minutes on each side OR until they are hot and have your desired level of browning/grill marks.
Place the beef skewers over a hot part of the grill.
Cook the skewers for about 2-3 minutes on each side, or until they have nice browning. These skewers are delicious cooked anywhere between medium rare and well done, so don't be overly concerned with the doneness. As long as you don't let them cook way past well done (more than 10 minutes) you should be fine.
Serve the hot skewers immediately with the grilled potatoes, green sauce, and salsa criolla on the side. ENJOY.
Here is my take on a Mexican shrimp tostada. Chilled shrimp, avocado, tomato, and cucumber are dressed with a bright, cilantro-y dressing. The shrimp “salad” is then placed on a crispy tortilla and drizzled with a smoky chipotle mayonnaise. The result is a bright, spicy, …
In the heat of summer, few things are as delicious as an ice-cold, super-fresh ceviche. While I love traditional Peruvian ceviche, sometimes it’s nice to riff on the classics. As I am a huge fan of Thai flavors, I came up with this ceviche which …
I love simple dishes that require little effort and yield delicious results. This is most definitely one of those dishes. It is also a very simple way to prepare fish for folks who are not very confident in their fish-cooking ability. The basic technique is very simple but the key is to use high-quality ingredients. The fish should be as fresh as possible, with no off-odors. The tomatoes should be ripe and sweet and you should use fresh, vibrant garlic and basil. As long as the ingredients are of good quality, it will be very easy to yield great results.
Choosing the right fish
While you could cook almost any fish in this manner, there are a few types of fish that work particularly well. I prefer to use white-fleshed, flaky fish. I also like to use fish that have soft, edible skin. The reason for this is because the gelatinous, fatty, skin helps to keep the fish moist as it cooks. I also love to eat fish skin, I don’t think it needs to be crispy to be delicious. If you hate fish skin, feel free to cook skinless fish fillets but just know that you are missing out on some flavor and moisture. Here are a few examples of fish that would work well, but feel free to use whatever you have on hand:
Striped bass/Rockfish (the fish I used in this recipe)
Snapper
Black bass
Branzino
What to serve with the fish
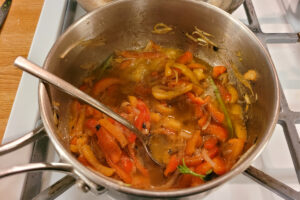
Sticking to the theme of simplicity and ease-of-making, I like to serve this dish with a simple side of potatoes that are roasted with peppers and onions. Everything is roasted together on a sheet tray and then the fish is spooned over the roasted potatoes with plenty of the stewed cherry tomatoes and their juices. You could also serve this dish with:
1-1.5poundboneless, skin-on fillet of flaky white fish, such as striped bass(scales removed)
2poundshalved cherry tomatoes
2/3cupsliced garlic
1tbspred chili flake(optional)
1/3 cupextra virgin olive oil
1small bunchbasil
salt and black pepper
Roasted potatoes with peppers and onions (optional)
2 or 3russet potatoes
1red bell pepper
2 or 3mild green pepper such as cubanelle or anaheim
1spanish onion
1/4cupextra virgin olive oil
salt and pepper
Instructions
Roasted potatoes with peppers and onions (optional)
If you will be serving the fish with this side of roasted potatoes, start cooking the potatoes first as they will need about 45 minutes in the oven.
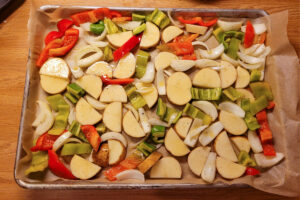
PREHEAT THE OVEN TO 475F – 500F. Cut the potatoes into 1/2 inch thick "half moons". Put them in a bowl of water to rinse away some excess starch and keep them from turning brown while you cut the rest of the vegetables.
Remove the stems and seeds from the red and green peppers. Cut the peppers into large rustic pieces. (1-1.5 inch pieces)
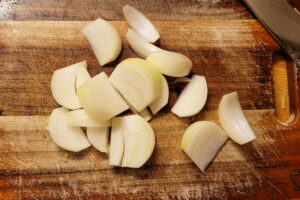
Cut the onion into 1/2 inch thick wedges.
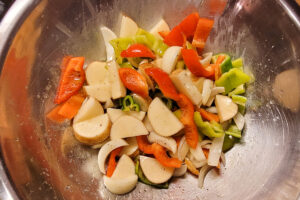
Drain the potatoes well and place them in a mixing bowl with the onions and peppers. Add 1/4 cup of olive oil and season everything well with salt and pepper. Toss everything to coat the vegetables evenly in the olive oil.
Line a sheet tray with parchment paper (or aluminum foil). Spread the vegetables in an even layer.
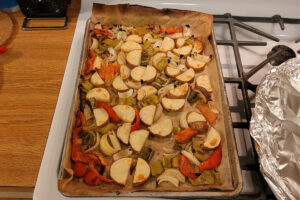
Place vegetables in the oven and roast until the vegetables are tender and lightly browned. You can start preparing the fish while the potatoes are roasting.
Braised Fish
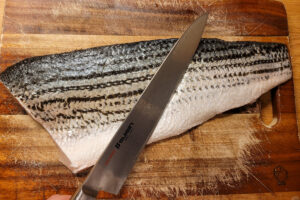
Use the blade of a knife to repeatedly "scrape" the fish skin from the tail to the head in order to remove any scales that might still be attached to the skin.
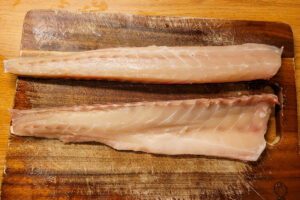
If your fish fillet(s) has a large bloodline, you can remove it in this step. This will also get rid of any remaining pin-bones. This step is optional and usually not necessary in fish with smaller fillets. Using a sharp knife, make a cut just above the center-line of the fillet.
Make a cut just below the center-line of the fillet. This will remove the center bloodline and any pin bones that may be present in this area of the fillet. Discard the bloodline.
Cut the fillet into roughly one-inch chunks. Season the flesh and skin side of the fillets well with salt and pepper. Set the fish aside for now. (I like to keep the belly flaps as this part of the fish is very moist and flavorful)
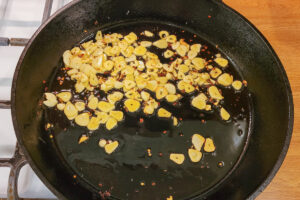
The garlic should be cut about 1/16th of an inch thick.
Put 1/3 cup olive oil into a large skillet. Heat it over medium-high heat.
When the oil starts to get hot, add the garlic and chili flake and cook while stirring.
Cook until the garlic is lightly brown and toasty. Do not let the garlic burn.
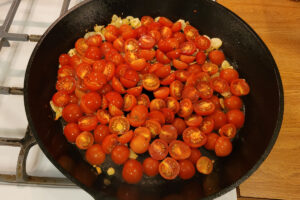
When the garlic is nice and toasty, add 2 pounds of halved cherry tomatoes. Season lightly with salt and pepper.
Turn the heat down to medium and cook the tomatoes until they start to soften and release their juices. You can press on the cherry tomatoes to help soften them up if necessary.
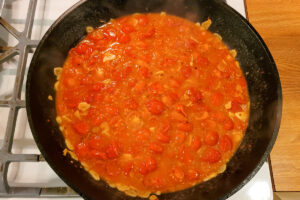
Once the tomatoes have softened up and released their juices, taste the "stew" and adjust the seasoning to taste with salt and pepper. If the tomatoes were not particularly sweet, you can also add sugar (to taste) to make up for any missing sweetness. Tear up some basil leaves and sprinkle them onto the potatoes.
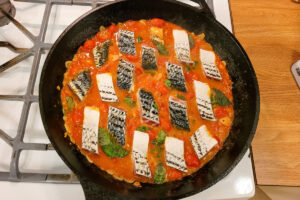
After adding the basil, place the fish pieces into the pan as shown. Some pieces of fillet will be thicker. Make sure to press the thicker pieces into the tomato stew so that they cook evenly. It is also better to put the thicker pieces near the center of the pan, where they will be exposed to a bit more heat during the cooking process.
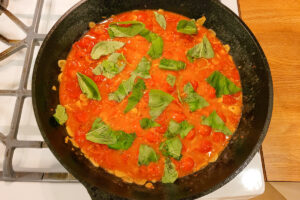
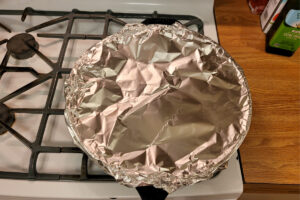
Keep the pan on medium heat, make sure the entire pan of tomatoes is simmering. Move the pan around on the flame if some parts of the tomato stew are not simmering. Once the whole pan is at a simmer, cover the pan tightly with a lid or aluminum foil. Let the fish cook for about 5-7 minutes while covered so that the tops of the fish fillets are cooked with the steam that is trapped in the pan.
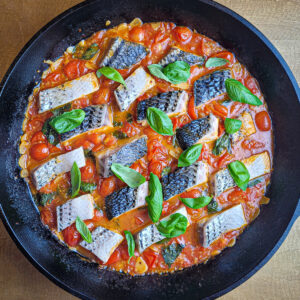
Pick a large piece of fish and cut it in half to make sure that the fish is cooked and the skin has softened and is edible. If it needs more time, cover the pan back up and continue cooking until all of the fish is cooked. Sprinkle some more fresh basil leaves on top to garnish.
Plate some of the roasted potato/peppers/onion in a bowl and top with a few pieces of fish along with plenty of the stewed tomatoes and basil.
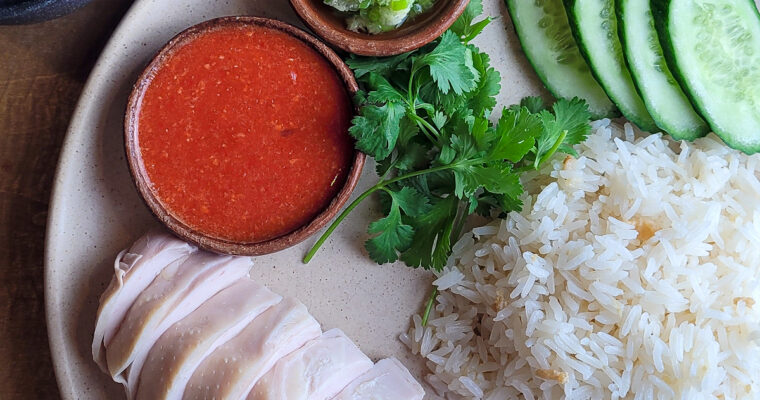
Hainanese chicken rice is one of my favorite “street” foods of all time. This dish is very popular in Singapore, Malaysia, and Thailand. Each country has slight variations on the same dish (the accompanying sauces are what seem to vary the most), and they are …
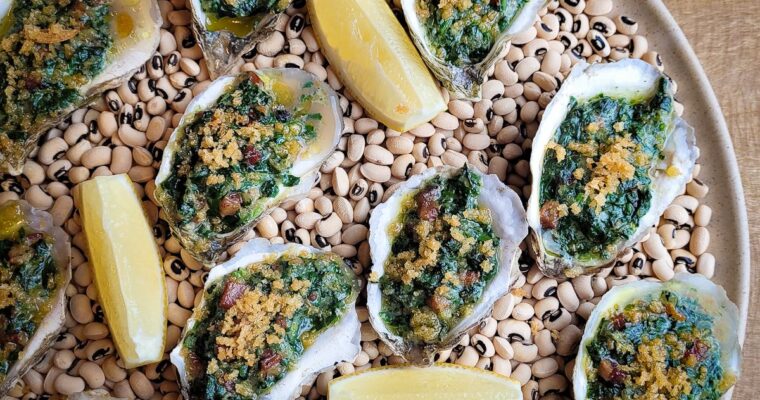
When I was working at Gramercy Tavern, we would always have some version of roasted oysters on the menu. The exact preparation would change seasonally but the idea was always the same… super fresh oysters topped with a flavorful compound butter, roasted in our wood-fired …
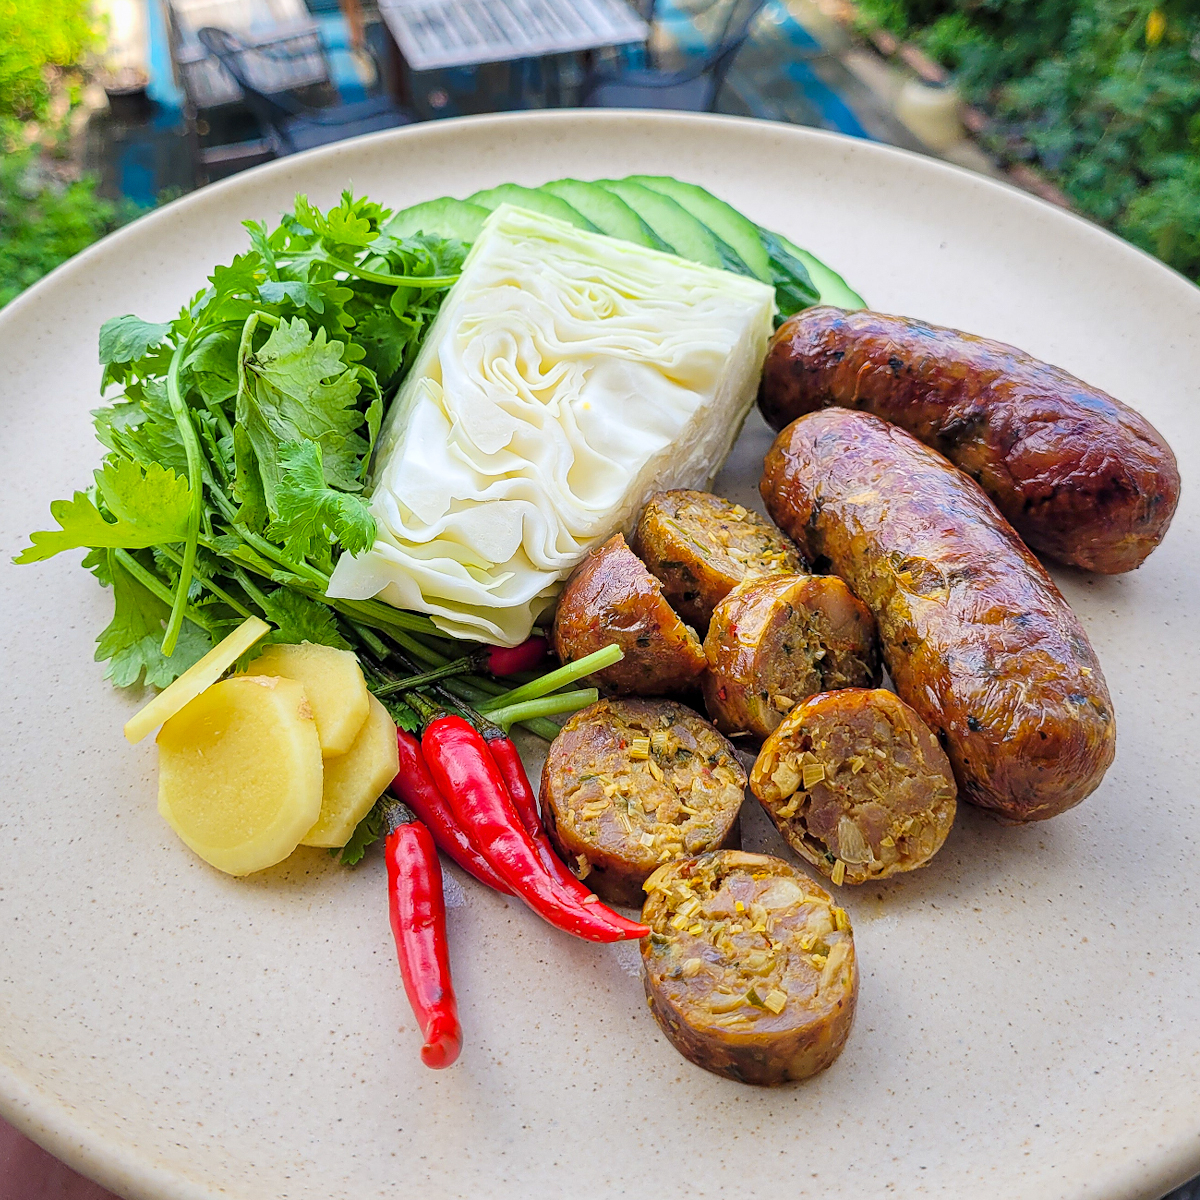
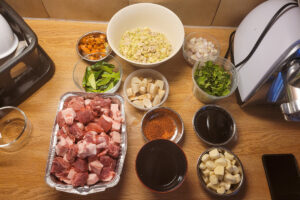
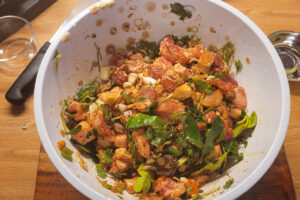
Sai Ua, AKA northern Thai sausage, is a type of fresh sausage that is commonly found throughout the northern region of Thailand. It is made with pork and a large quantity of fresh aromatics such as lemongrass, galangal, garlic, and makrut lime leaf. The sausage is complex, herbal, rich, and extremely aromatic. This is a bit of a project, but the sausages keep very well in the freezer. Feel free to make a double batch!
Ingredients
Once I learned how to make Sai Ua, I realized why this sausage is not very well known in the west. Many of the ingredients are very hard to find fresh. Fresh lemongrass, galangal, turmeric, and makrut lime leaves are essential to achieving the proper herbaceous, aromatic flavors. Any dried or powdered version of these ingredients will totally fail to achieve the right flavor. Luckily, many of these ingredients can be found fresh-frozen. The fresh-frozen variety of these ingredients work very well for making Sai Ua. Fresh lemongrass is becoming more common in western grocery stores. Frozen whole galangal and turmeric roots can be found in many Asian and Southeast Asian grocery stores. Makrut lime leaves (aka kaffir lime leaves, but that name is no longer politically correct) can also be found fresh or frozen in some Asian groceries.
Making the Sausage
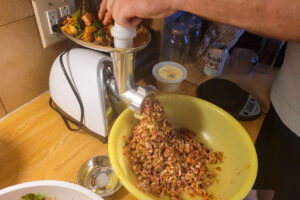
The best versions of Sai Ua that I have tasted in Thailand all have a coarse, rustic texture that I find quite appealing. The pork is ground coarsely and the aromatics are often very coarsely chopped or pounded so that you can clearly see bits of lemongrass, lime leaf, galangal… in every bite you take. Sai Ua should not be perfectly emulsified and smooth as is common in many of the western styles of sausage. I find the easiest way to achieve this texture is to coarsely chop all of the aromatics and mix them with the cubes of pork before grinding. The pork and aromatics are then ground together using a coarse grinder die (approximately 7mm holes) before casing. Easy.
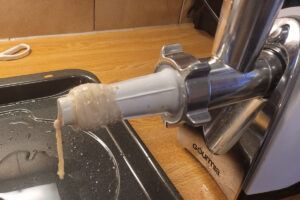
NOTE: I will not be going over “proper” sausage stuffing and linking technique. There are many good resources online to learn how to stuff a sausage.
Meat grinder with medium-coarse grinder die (holes about 7-8mm or 1/4" in diameter)
Funnel, sausage stuffer, or stuffer attachment for the meat grinder
kitchen scale
Ingredients
1400gramslean pork, ideally shoulder
600gramspork fat(try to use solid, harder pork fat)
20gramssalt
170gramssoy sauce
100gramsfish sauce
30gramsmakrut lime leaves, center stem removed
110gramchopped cilantro stems and roots(some leaves are OK0
320gramsroughly chopped lemongrass(tender parts only)
200gramsroughly chopped fresh or thawed galangal(peeled if the skins are very tough)
70gramsroughly chopped fresh or thawed turmeric root
200gramsroughly chopped shallot
240gramsgarlic cloves
3Tbsptoasted red chili flake
40gramspalm sugar or light brown sugar
20gramsThai shrimp paste (gapi)
80gramsroughly chopped scallions
pork sausage casings(as needed)
Instructions
Cut the pork and pork fat into roughly 1-inch chunks. Mix the fat and lean pork together and place in the freezer until it is half-frozen, about 20-30 minutes, Cut and weigh out the rest of the ingredients.
When the pork and fat are half-frozen (it should not be frozen solid), mix with all the rest of the ingredients (besides the pork casings) in a large bowl .
Using a medium-coarse grinder die (holes about 7-8mm or 1/4" in diameter), grind everything together once. "Knead" the ground sausage a few times using your hands.
Rinse the sausage casing very well inside and out using cold water and attach them to whatever implement you will be using to stuff the sausages. I will not be going over "proper" sausage stuffing and linking technique. There are many good resources online to learn how to stuff a sausage.
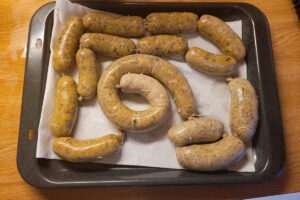
Stuff the sausage into the casings and form individual links or large coils, depending on what you prefer. Pat the sausage dry and lay on an uncovered sheet tray and allow to dry overnight in the refrigerator. Pat dry and flip the sausages halfway through so that both sides of the sausage casing get a bit dry. Freeze whatever sausage you will not be cooking within 2 or 3 days.
Cook the sausage using whichever method you prefer. For the ideal smokey flavor, cook over charcoal or wood.
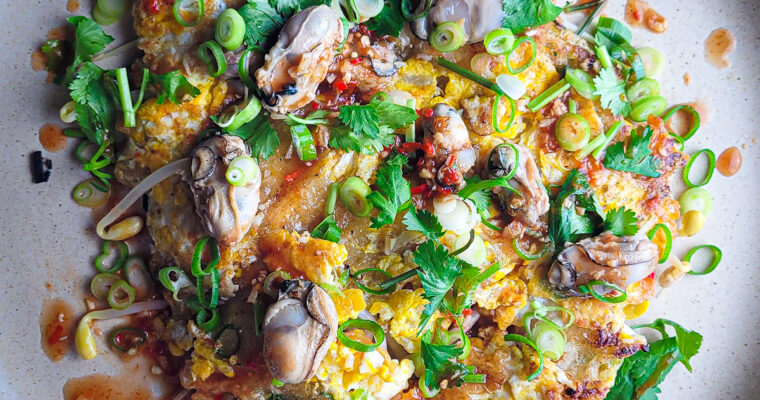
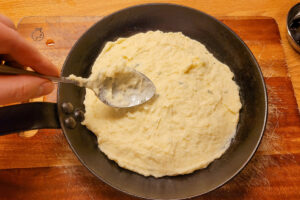
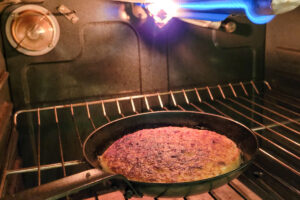
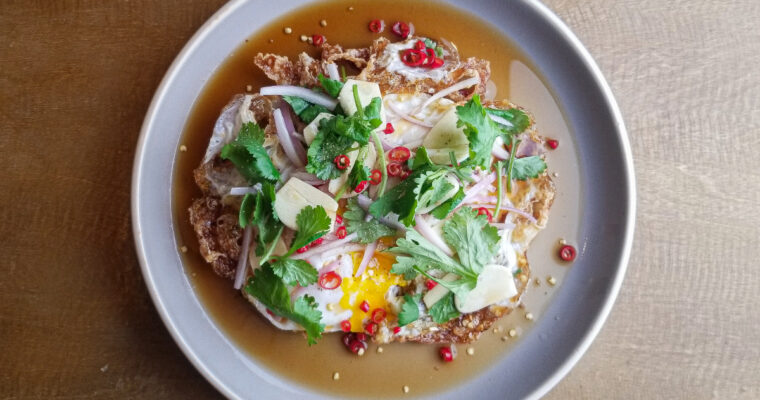
This is my version of Hoi Tod – หอยทอด – AKA Thai crispy oyster pancake. If you are unfamiliar with this dish, think of it as somewhere between a savory pancake and an omelet. It is not unlike a Korean seafood pancake with the addition of …
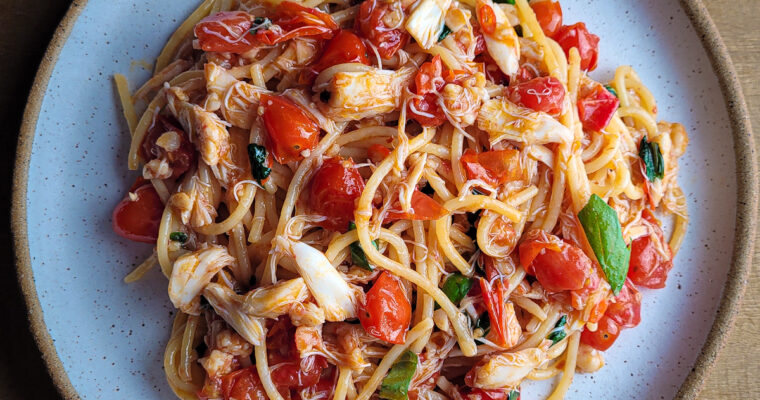
I love dishes that are quick and easy to make, but deliver on flavor. I am much more likely to prepare them when I don’t feel like spending over an hour cooking dinner. This shrimp and crab spaghetti is light, yet satisfying and can easily …
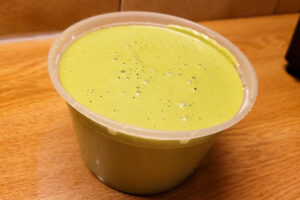
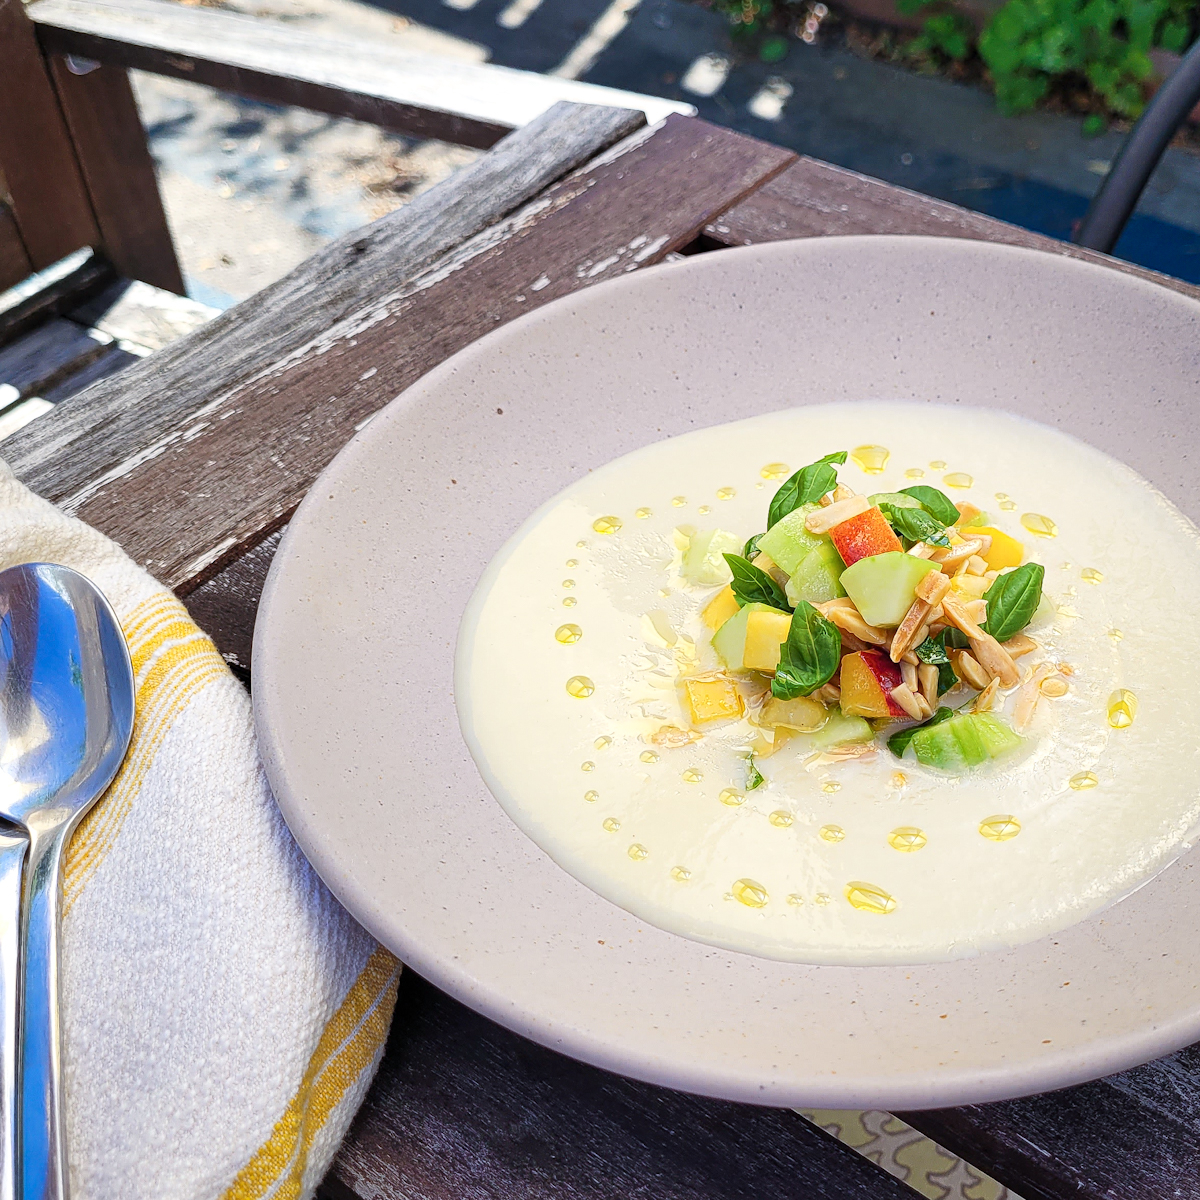
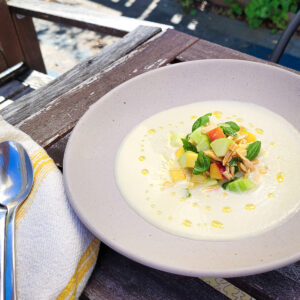
This simple chilled soup is a great addition to any summertime meal. The gazpacho itself only takes about 15 minutes to prepare and the only cooking required is toasting a few almonds in the oven. Make sure to serve the gazpacho very cold and with plenty of diced peach, cucumber, and toasted almonds. The texture and crunch of the garnish really improves the eating experience of this chilled soup.
How is it made?
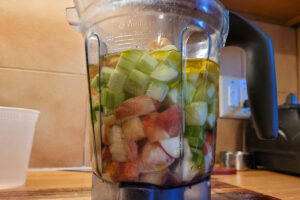
The gazpacho is easy to make. Cucumbers and peaches are blended with celery, garlic, stale bread, olive oil, water, vinegar and a touch of habanero pepper. The seeds and membranes of the habanero are removed so you are only left with a bit of heat but retain a touch of habanero flavor. You can also omit or substitute any other type of pepper you prefer. If you have access to any super-aromatic-yet-not-spicy peppers such as habanada, grenada, or aji dulce; feel free to use these and increase the quantity of pepper so that you maximize on their fruity flavor.
1 small habanero pepper, mincedremove seeds and inner white membranes and rinse the peppers to reduce spiciness
1Tbspolive oil
1Tbsplemon juice
salt, to taste
Gazpacho
1 cupcelery, cut in 1/2 inch dice
2 cupsenglish cucumber, peeled and cut in 1/2 inch dice
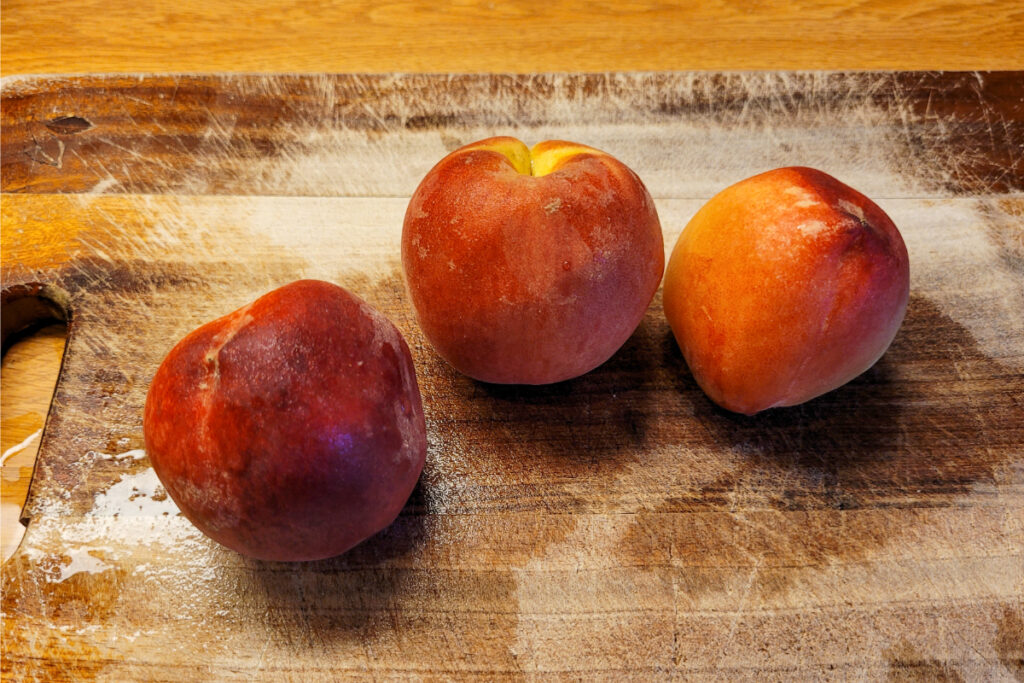
3cupsripe white peach, cut in 1/2 inch dice
1medium sized clove of garlic(5 grams)
1cupstale sourdough or other bread, cut in 1/2 inch dice
5Tbspextra virgin olive oil
3cupscold water
1 or 2habanero peppersremove seeds and inner white membranes and rinse the peppers to reduce spiciness
1Tbspkosher salt
1Tbspwhite wine vinegar
Instructions
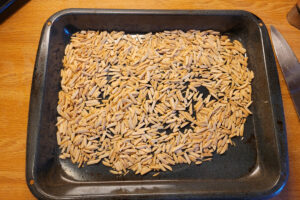
Preheat the oven to 300F. When oven is hot, spread slivered almonds on a baking sheet and bake for apprximately 10 or 15 minutes, or until almonds have take on a toasty color. Allow almonds to cooklto room temperature before using in the gazpacho.
Combine all of the ingredients listed under "gazpacho" (NOT the ingredients listed under "garnishes") and add them to the blender. Blend very well until gazpacho is very smooth. Place gazpacho in the refrigerator until it is very cold. After it has chilled completely, adjust consistency with more water if soup is too thick. Now you can also adjust the seasoning with more salt and vinegar if necessary. (If you want to serve the soup immediately after blending, place soup in a metal mixing bowl set over an ice bath and whisk soup until it is very cold)
Chill 4 serving bowls.
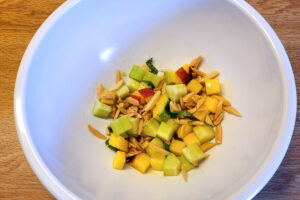
Place all of the ingredients listed under "garnishes", including the toasted almonds, in a mixing bowl, mix well and and season with salt.
Divide the garnish into the 4 chilled bowls and pour the cold soup into the bowl as well. Drizzle soup with a bit more olive oil. Make sure soup and bowls are as cold as possible before serving.
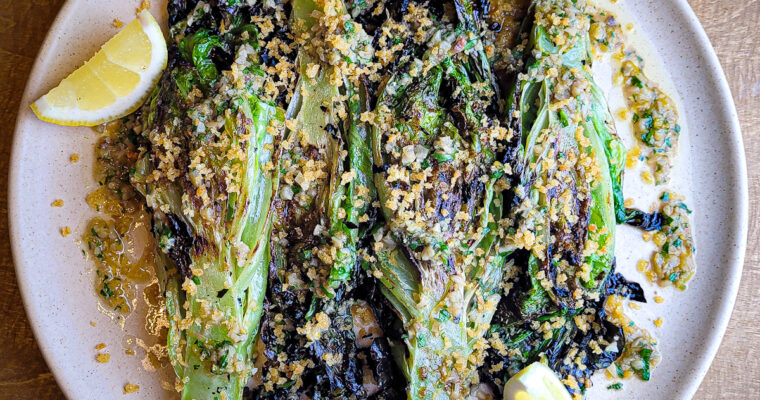
When summer comes around, it is good to have a few grilled vegetable side dishes in your repertoire that are easy to make and really deliver on flavor. This is one of those dishes. If you have never had grilled romaine lettuce, you should give …
Here on the east coast of the United States, soft shell crabs come into season in the summer months. Many cooks fry them until crispy and then serve them with a few simple garnishes. I love eating soft shell crabs this way, but preparing them …
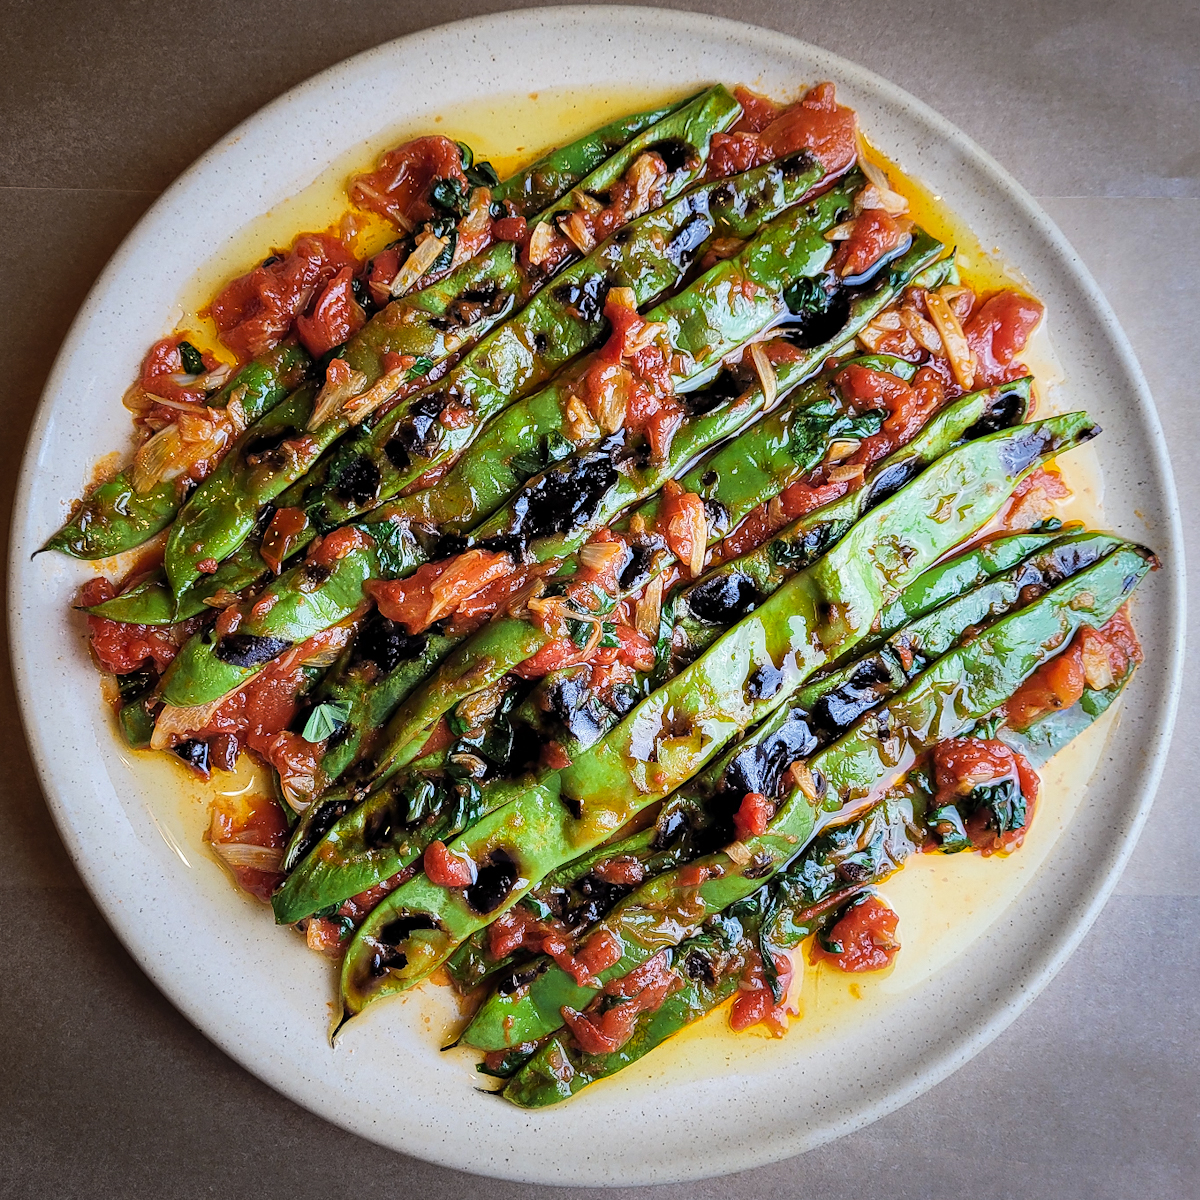
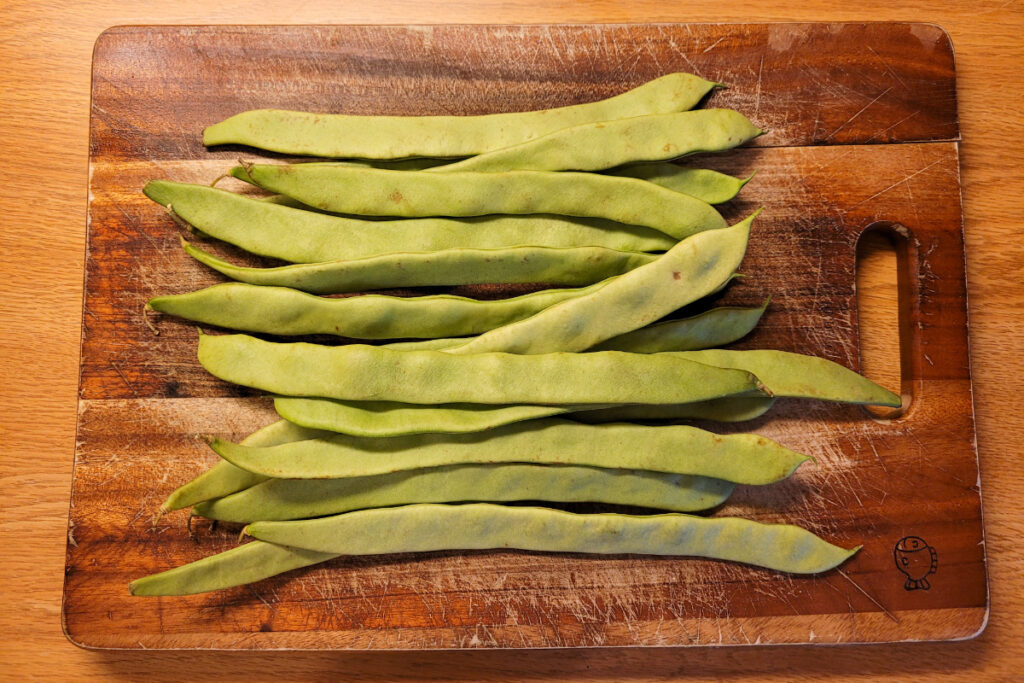
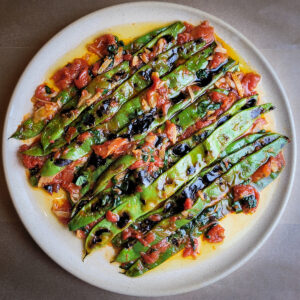
Romano beans are long, flat beans that kind of look like flattened string beans. While you can cook them briefly so that they retain their natural crunch, I really like when they are cooked a bit longer…until they are soft and sweet. In this recipe we will give the beans a quick grill to impart a bit of charred flavor and then cook them in a garlicky tomato sauce until soft. If you do not have a grill, you can sear them in a very hot pan before braising. After a brief braise, the romano beans are finished with fresh basil and plenty of olive oil. This side dish/appetizer tastes better after it has cooled down a bit so feel free to prepare it ahead of time. This dish works great for a backyard barbecue as it is light, tasty, and very easy to make.
1 cupgood quality, whole canned tomatoes, with their juice(I like Bianco Dinapoli brand)
2/3cupchicken stock or water
1tspfish sauce or colatura(optional but recommended to add a savory flavor)
1/2cupchiffonade fresh basil(1/4 inch wide chiffonade)
about6 tbspextra virgin olive oil
1 tspsugar
kosher salt
1/3cuptoasted pine nuts(optional)
Instructions
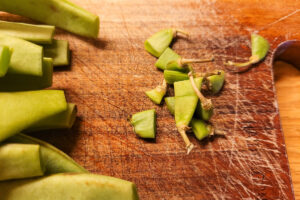
Remove the stems from the romano beans. Wash the beans and pat them dry with a towel.
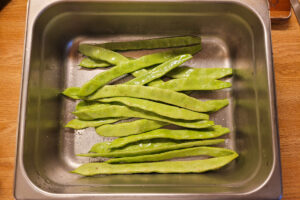
Toss the romano beans in the neutral oil and season with salt. Make sure the oil completely coats all of the romano beans in a very thin layer. If you use too much oil, the excess oil could flare up as you grill the beans.***if you do not have a grill, you can sear the beans in a hot skillet until lightly charred on both sides***
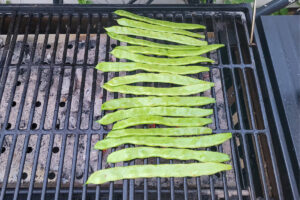
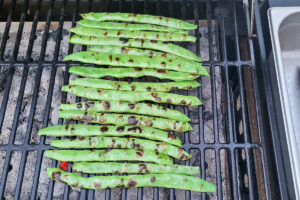
Get your grill very hot and lay the romano beans in one layer on the hottest part of the grill. Allow the romano beans to cook for about 2-4 minutes or until they have started to lightly char.
Flip the beans and cook them the same way on the other side. remove the beans from the grill and keep them on a plate until ready to add them to the tomato sauce.
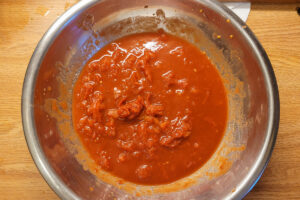
Using clean hands, crush the whole tomatoes (along with the tomato juice) between your fingers so that they form a rustic, chunky tomato sauce. Set aside
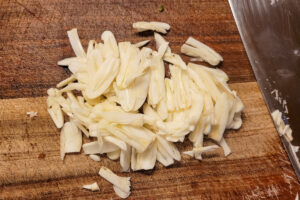
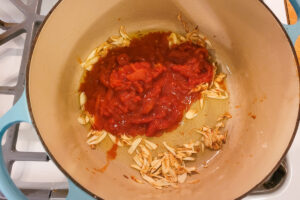
Slice the garlic thinly.
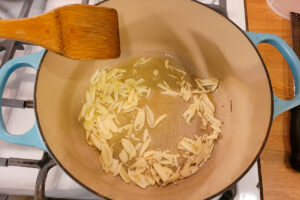
Heat a large saute pan or dutch oven over medium heat. Add 3 tbsp of olive oil and the sliced garlic to the pan. Cook garlic while stirring until it becomes golden brown, about 1-2 minutes.
When the garlic is golden brown, Add the crushed tomato to the pan. Cook for 1 minute.
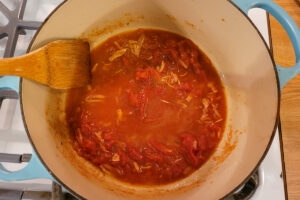
Add the stock/water, sugar, and fish sauce to the pan. If you are using pine nuts, add them now. Turn the heat down to low and simmer the sauce for 1-2 minutes.
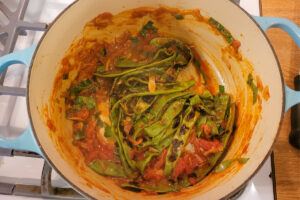
Add the romano beans and chiffonade basil to the pan and cook at a low simmer for at least 5 minutes and until the beans are very soft and the sauce is no longer watery. If the sauce begins to dry up prematurely, feel free to add a bit more stock or water to adjust the consistency.
When the beans are done cooking, adjust seasoning with salt if necessary. Plate the beans and sauce on a flat plate and drizzle them with a generous quantity of olive oil, about 3 tbsp. I like to let the beans cool off and "marinate" on the serving plate for at least 10-15 minutes before eating.
This English pea crostini is a great appetizer to serve when the weather starts getting warm in the spring and summer. It is also great for entertaining because almost everything can be made ahead of time (including the crispy bread) and assembled easily when guests …
Green papaya salad is a dish that originates in Laos and is an important dish in Thai cuisine. It is closely associated with the cooking of northeastern (Isan) Thailand but can be found all over the country. You can eat papaya salad at fancy restaurants, …
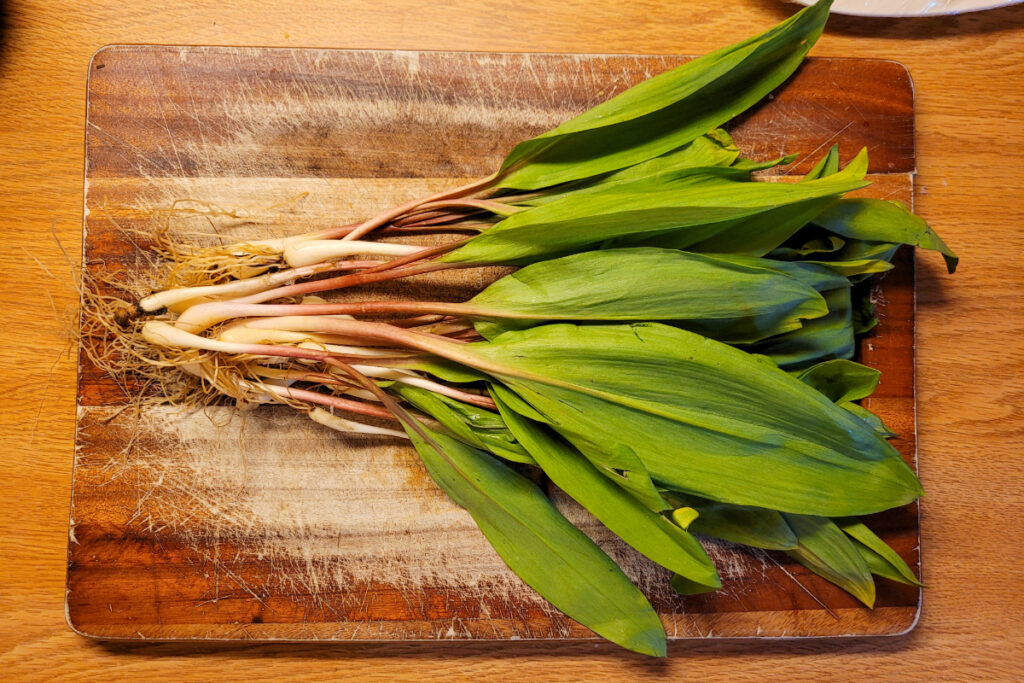
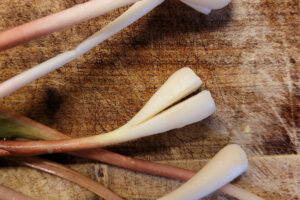
For a few weeks in early spring, ramps pop up in many parts of eastern North America. Ramps are a type of wild onion with a pungent, garlicky flavor. The leaves and bulbs are both edible and can be used in a number of different ways. Ramps resist cultivation, are only available to foragers for a limited time, and their appearance tends to mark the beginning of the spring produce cycle. For these reasons, chefs and food lovers tend to get VERY excited when ramps start hitting the markets. Because ramps are often over-foraged, I try to limit the number of times I prepare whole ramps in this way. It is more sustainable to only buy the green leaves from foragers who leave the bulbs in the ground so that the ramps can pop up again the following year.
While I love eating ramps, I am of the opinion that many chefs fail to prepare ramps in a way that truly celebrates their texture and flavor. I often see the ramps turned into a puree, or used to fill a pasta, or maybe 2 or 3 ramps are sauteed and artfully arranged on a plated entree of some sort. While these are all fine preparations and can be quite tasty, my favorite way to eat ramps is very simple. A big pile of them charred on a hot grill or a cast iron pan, seasoned simply with olive oil, salt, and a squeeze of lemon. This may be the purest way to enjoy them. The recipe I am showing you today is exactly that, but with a few added flavors and textures. The key is that you serve a generous quantity of ramps and that they are cooked and seasoned properly.
Ramps
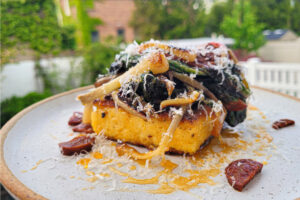
The combination of ramps, polenta, and honey was inspired by a dish I had at Via Carota in Manhattan a few years ago. If you haven’t been to Via Carota, I highly recommend it. My memory of the dish is a bit hazy but I remember a grilled polenta cake being served with a big pile of grilled ramps and drizzled with honey. It was absolutely delicious and I really loved how they were generous with the ramps. I’m not sure how they prepared their dish but this is my version with a few tweaks.
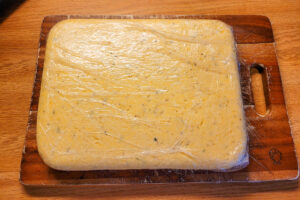
Polenta Cake
I decided to make a polenta cake flavored with parmesan, pecorino, thyme, and black pepper. Kind of cacio e pepe-ish. If you have never made a polenta cake, don’t worry, it’s really very simple and doesn’t take too much effort. If you can’t be bothered waiting a few hours for the polenta cake to set up in the freezer/fridge, you can most certainly make this dish with creamy polenta, just use more liquid when cooking the polenta.
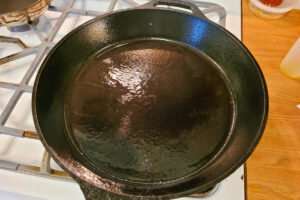
Grill vs Cast Iron
In this recipe, I used a cast iron pan to sear the polenta cake and cook the ramps and chorizo together. If you wanted, you could also use a hot grill to cook the polenta and ramps. The chorizo would need to be crisped up separately in a pan, omitted, or switched out for another cured pork product that can be crisped on a grill such as bacon or prosciutto. Whatever cooking method you choose for the ramps, make sure that they are cooked quickly over high heat. If you leave the ramps cooking for too long, the leaves will start to dry out and become papery.
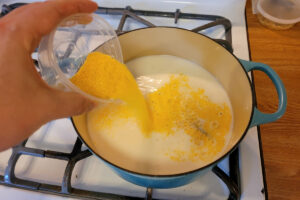
Whisk together 2 cups milk, 2 cups chicken stock (or water), 1 bay leaf, and 1 cup polenta in a heavy-bottomed pot. These photos show me making a double batch of polenta cakes, your batch will look smaller. **If you are serving creamy polenta see 2nd note below**
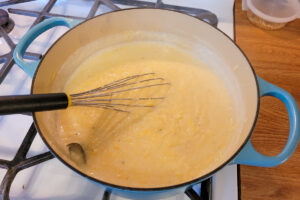
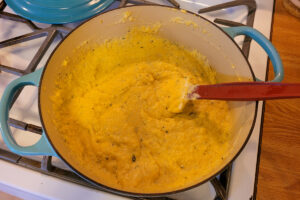
Turn the heat to high and whisk continuously until the liquids come to a simmer. The polenta should start to thicken once simmering. After the polenta starts to simmer, turn the heat down to low and season with 2 tsp kosher salt, or to taste. Note that you will be adding salty cheese later so you may want to slightly under-season at this point.
Put a lid on the pot and allow the polenta to cook at a gentle simmer on low or medium-low heat for 30 minutes. Check the polenta every 5-10 minutes while it is cooking and scrape the bottom of the pot to ensure the polenta does not scorch.
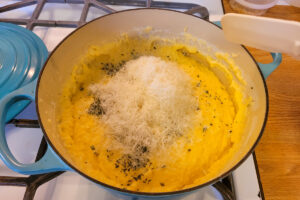
Remove and discard the bay leaf and add1.5 oz grated parmesan, 1 tsp chopped thyme, and 6-8 grinds of black pepper. stir everything together. Adjust seasoning if necessary
Polenta should be thick, not loose or runny.
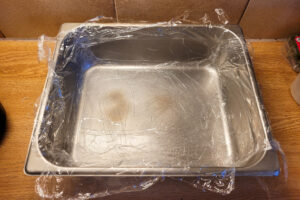
Line a 7" x 7" square pan with plastic wrap. Leave extra plastic wrap overhanging so you can fold it on top of the polenta cake. If you dont have a 7×7 pan, you can use almost any other container to form the polenta cake, just try to make it so that the polenta is not more than 1" thick when you pour it in. ( In the photo I am using a 10" x 12" pan because I am making a double batch)
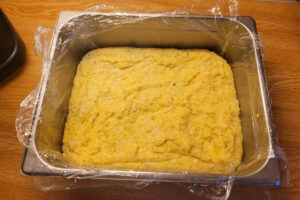
Pour the hot polenta into the pan and smooth the top with a spatula.
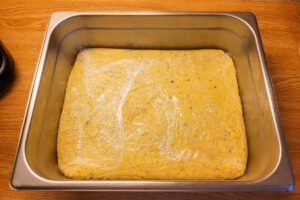
Fold the excess plastic wrap on top of the polenta. Use additional plastic wrap if necessary to totally cover the top of the polenta cake. Press and smooth the top of the polenta cake after covering. Place the polenta cake in the refrigerator for 6 hours or in the freezer for 2 hours if you are in a rush.
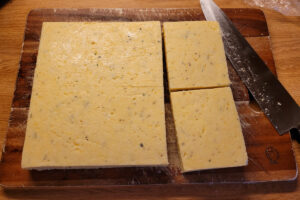
After polenta has cooled, it should have firmed up and should easily pop out of the pan.
Cut the polenta into 4 squares and keep covered in the refrigerator until ready to use. The following recipe will only use one polenta cake and will feed 2-4 people as an appetizer or side dish. Leftovers can be kept in the fridge for up to 4 days. Polenta cakes go very well with fried eggs and hot sauce for breakfast.
Assembling the dish (for 1 polenta cake which feeds 2-4 people as a side dish or appetizer)
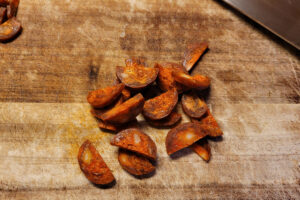
Cut the dry chorizo in half lengthwise and then into 1/8" thick slices. Set aside.
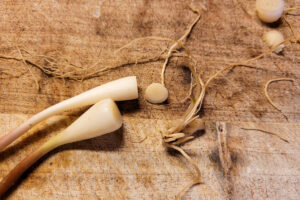
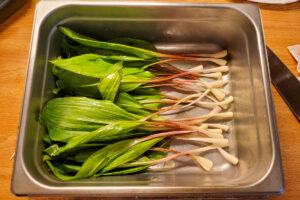
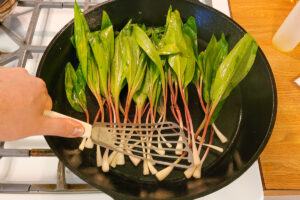
Remove the roots from the ramps
If the ramp bulbs are particularly big (larger than 1/3" in diameter), cut them in half as shown to allow them to cook faster.
Wash the ramps to remove excess dirt and shake them dry. Use your hands to rub the bulbs and leaves with a very thin layer of cooking oil. Season the leaves and bulbs evenly with salt. You can apply a bit more salt to the bulbs than the leaves. Try to keep the ramps all facing the same direction so the bulbs are all on one side. Set aside
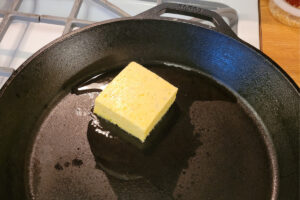
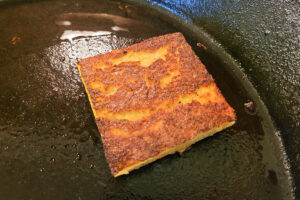
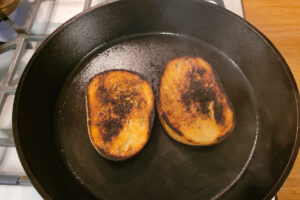
Heat a cast-iron or nonstick pan over medium heat, apply a bit of cooking oil and cook the polenta cake for about 5 minutes on one side until golden-brown and crisp.
Flip the polenta cake over and cook on the other side for about 5 more minutes until golden-brown and crisp. Remove from pan and set on a paper towel to absorb excess oil.
Heat up a large cast-iron pan or skillet over very high heat. Add a thin layer of cooking oil to the bottom of the pan.
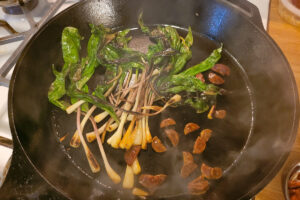
When the oil begins to smoke, spread the ramps out into the hot pan and use a spatula to constantly press on the ramp bulbs so that they come into contact with the pan. Cook over high heat for about 1-2 minutes or until the leaves have started to char but are not drying out.
Flip the ramps over and add the chorizo to the pan. Press on the ramp bulbs again and cook everything for about 1 more minute.
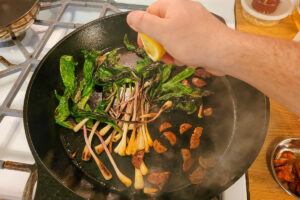
When the ramps are wilted, slightly charred and the bulbs have softened, turn off the heat and squeeze 1-2 tbsp of lemon juice over the ramps. Remove the ramps and chorizo from the pan.
Put the polenta cake in the center of a plate and then put the pile of ramps and chorizo on top. Drizzle everything with 1-2 Tbsp of hot honey and sprinkle 1-2 tbsp of grated parmesan on top to garnish. Serve warm.
Notes
**purchase hot honey or make by simmering 1 cup honey with 2 tbsp red chili flake or 5 halved red Thai bird chilies for 10 minutes and allowing to rest for 3 hours before straining****if you are serving creamy polenta, you will need to use more liquid. Cut the polenta cake recipe in half and increase the milk to 1.5 cups and the stock/water to 1.5 cups**
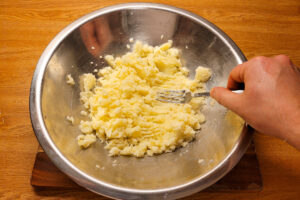
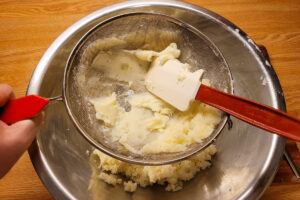
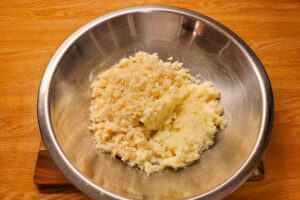
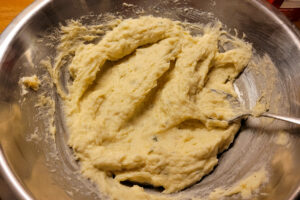
Papa a la Huancaina is a classic Peruvian appetizer. It is best described as a type of potato salad that is dressed in a sauce made with peppers, milk and queso fresco. The sauce is traditionally made with Peruvian aji amarillo (yellow hot peppers) and …
This is one of my go-to recipes whenever I have some really fresh fish on hand and don’t want to over-complicate things. It takes very little time to throw together and is super refreshing and delicious. The great thing about this recipe is how flexible …
Sticky rice with mango is one of the most well-known Thai snacks/sweets…and for good reason…it is absolutely delicious. When mangoes are in season and super sweet, you really can’t go wrong eating them this way. The sweet (and slightly salty) combination of mango, coconut, and sticky rice is pretty much perfect. Luckily, it is also very easy to make at home as long as you have the right ingredients.
Ingredients
Make sure you use ripe, sweet mangoes when making this dish. I like to use ataulfo mangoes as they are nice and sweet but you could use whatever variety is available to you. To check if a mango is ripe, give it a gentle squeeze. It should give in to gentle pressure. If a mango is very hard, it will typically not be very sweet. This dish also works very well with ripe durian instead of mango, if you can find it.
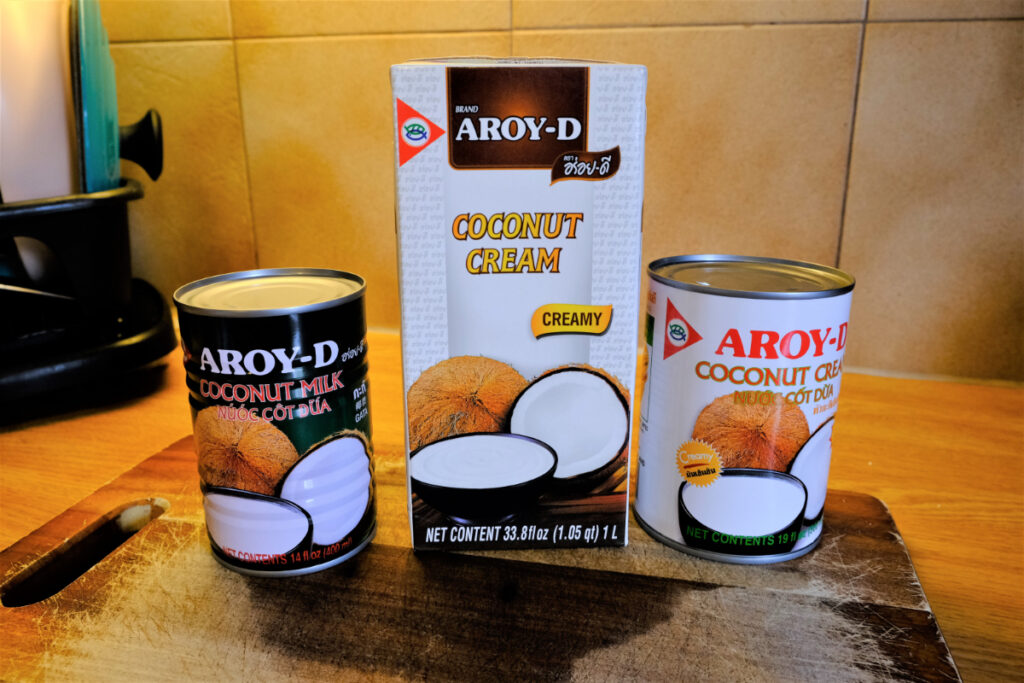
I like to use coconut cream instead of coconut milk to make mango sticky rice as it is thicker and richer. That being said, you can most definitely make this dish with regular coconut milk. I like to use Thai brands of coconut cream/milk such as Aroy-D and Chaokoh. Do not confuse “coconut cream” with “cream of coconut”. Cream of coconut is a completely different product that is already sweetened and will not work well in this recipe.
Aroy-D makes good coconut milk and cream.
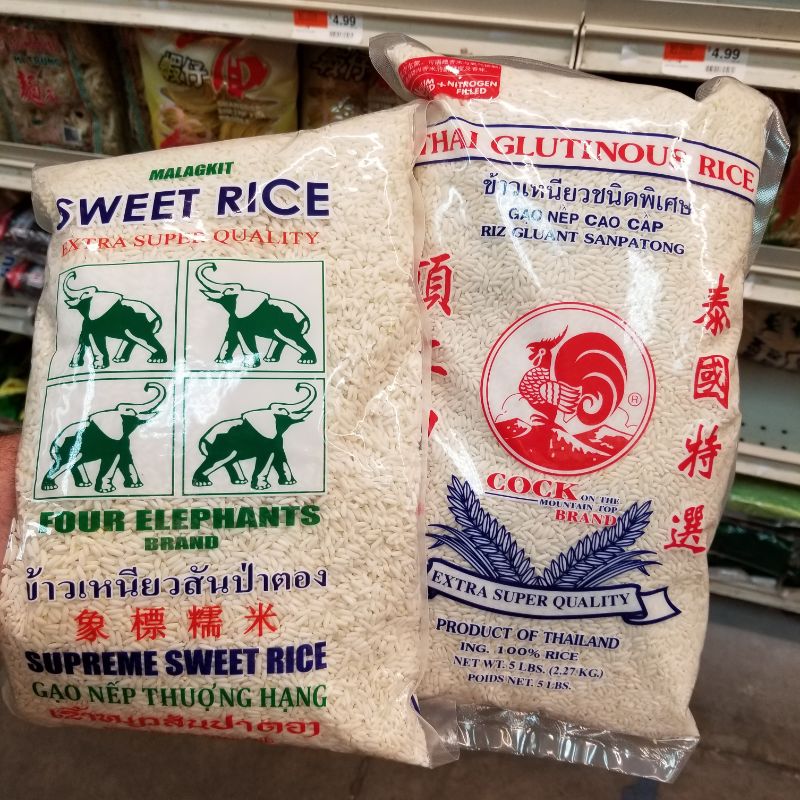
To make mango sticky rice you need to use the right rice. Unfortunately it can be often difficult to find and may be packaged using a few different names. I typically see it labeled as glutinous rice or sweet rice. This is not to be confused with Japanese glutinous or sweet rice, which is used for mochi. Your best bet is to buy sweet or glutinous rice that is grown in Thailand. If you attempt this method with the wrong rice, you will most likely be disappointed.
This is the right stuff.
Steaming the rice
Steaming of the sticky rice is probably the most “difficult” part of making this dessert so I will provide some notes here:
Sticky rice needs to be washed and soaked before cooking. Washing helps to remove excess starch on the outside of the grains of rice and provides the correct texture for this dish. To wash the rice, place the rice into a mixing bowl and cover it with an inch or two of cool water. Use your fingertips to vigorously agitate the rice for 10 seconds or so. You will notice the water begin to get cloudy. Tip the bowl over into a sink so that most of the cloudy water is drained away but the rice remains in the bowl. Fill the bowl up with water again and repeat this process until the water is relatively clear, usually about 3 or 4 times. After washing, cover the rice with a few inches of cool water and allow the rice to sit at room temperature to soak for anywhere between 4 and 24 hours. Soaking is essential for hydrating the grains of rice and making sure they cook properly. Don’t soak your rice for more than 24 hours as it can start to ferment and go sour.
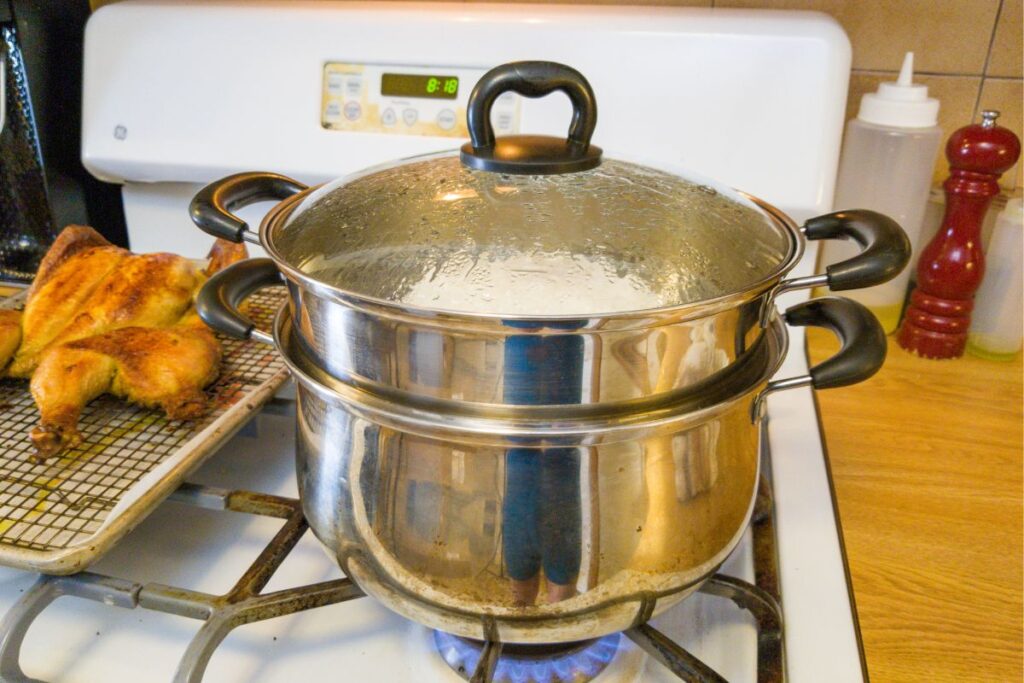
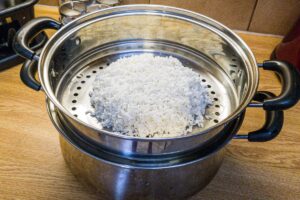
In many parts of Southeast Asia, sticky rice is traditionally cooked in a special bamboo basket. The rice is washed, soaked and cooked over a pot of boiling water. Most people I know don’t have space in their kitchens for a dedicated sticky rice steamer so I will show you how to steam the rice in a conventional stack-able steamer. You can also get creative with how you steam the rice. A colander set on top of a pot of boiling would also do the trick. Whatever method you use to steam the rice, make sure the rice does not come in direct contact with the boiling water. Also make sure to drain the sticky rice very well before placing in your steamer. Any excess water left in the rice will settle to the bottom of the rice and cause the bottom layer of rice to get gummy and overcooked.
This is the steamer I use.
When you are ready to cook the rice, Fill the bottom of your steamer with about 1 or 2 inches of water. Bring to a boil. Make sure you have enough water to avoid evaporation, but not so much that the boiling water is splashing up onto the rice. Drain the rice very well and place onto a dry steamer tray. Place the tray on the steamer and cover with a lid. Allow the rice to cook for about 15-20 minutes.The steamer should be producing a good bit of steam while cooking without being overly aggressive. After 15 minutes, carefully open the lid and use a fork to taste a bit of rice from the very center. If it is still crunchy or too toothsome, allow the rice to cook longer, checking every 5 minutes until finished.
The sticky rice is now ready to be mixed with the coconut sauce. Do not allow the sauce or the sticky rice to cool before mixing them together. The rice needs to be hot in order to absorb all the sauce.
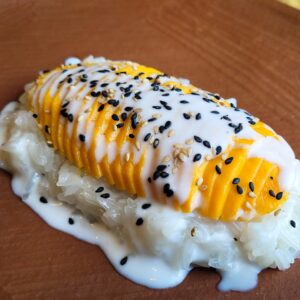
Sticky Rice with Mango
Ian Benites
A sweet and satisfying dish of ripe mango with coconut sticky rice.
1.5cupsuncooked Thai glutinous or sweet rice (make sure you have the right rice, see above)
1 cupcoconut cream or coconut milk(do not use cream of coconut)
3/4cupsugar
1tspkosher salt(use 1/2 tsp if using table salt)
Coconut Sauce
1 tsprice flour(can substitute corn starch)
1 Tbspwater
1/2cup coconut cream or coconut milk(do not use cream of coconut)
1/2tspkosher salt(use 1/4 tsp if using table salt)
2 tsp sugar
18" piece of pandan leaf, tied in a knot(optional)
To Serve
2ripe mangoes
a few teaspoons sesame seeds(white, black or a combination)
Instructions
Sweet Coconut Sticky Rice
Wash the rice in 3 changes of cool water. Cover rice with 2 or 3 inches of cool water and soak at room temperature anywhere between 4-24 hours
Fill the bottom of a steamer with a few inches of water and bring to a boil. Place rice onto a steamer tray in an even layer and steam for 15-20 minutes. Taste the rice to see if it is cooked and no longer hard and crunchy in the center. If it needs more time, continue steaming, checking every 5 minutes.
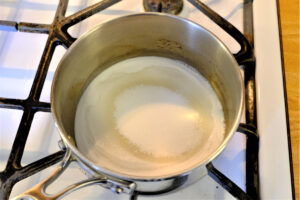
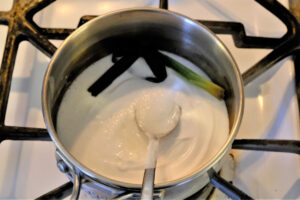
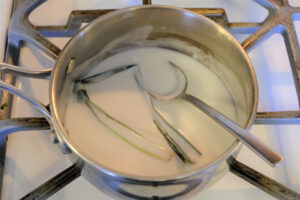
While the rice is steaming, combine 1 cup coconut cream/milk with 3/4 cup sugar and 1 tsp kosher salt in a small pot.
Bring to a simmer over medium heat while stirring until sugar is dissolved. Turn off the heat and set aside until rice is ready. Warm it up back up slightly right before mixing it with the rice.
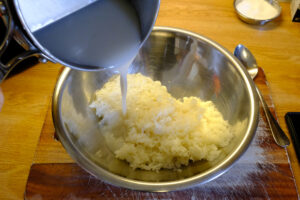
When rice is finished cooking, immediately place it in a bowl while it is still hot. pour the prepared coconut mixture over the rice and stir to combine. The rice will appear very loose and soupy at this point. That is OK.
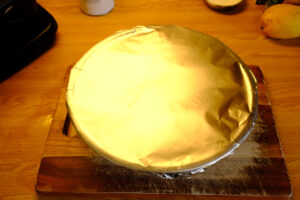
Immediately cover bowl with foil and allow it to rest for 30 minutes.
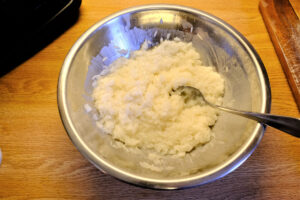
Uncover the rice and give it a stir. Cover the bowl up again and let the rice rest another 10 minutes or until ready to serve. You can keep the rice at room temperature, covered, for up to 8 hours.
Coconut Sauce
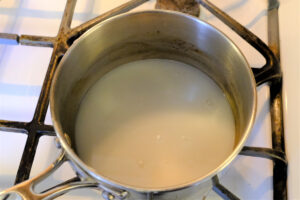
In a small pot, off the heat, mix 1 tsp rice flour and 1 Tbsp water until rice flour is completely incorporated. Add the 1/2 cup coconut cream/milk, 2 tsp sugar, 1/2 tsp kosher salt and the piece of knotted pandan leaf to the pot as well.
Stir everything to combine and then heat the pot over medium heat while stirring until the mixture comes to a simmer. The sauce should start to thicken slightly when the mixture comes to a simmer. Simmer for 1 minute and then turn off the heat. The sauce should have a loose, saucy consistency. It will also thicken slightly as it cools. If the sauce is still very watery, feel free to add a little more rice flour by first dissolving it in a little water. Simmer it until it thickens up more. Do not at dry rice flour to the sauce as it will get clumpy. Let the sauce cool to room temperature.
To Serve
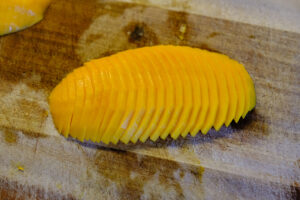
Peel the mangoes and either slice, or dice the flesh.
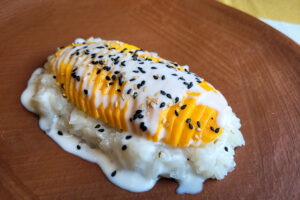
Place the sweetened sticky rice on 4-6 plates along with some fresh mango. Drizzle the plate with some of the sauce and sprinkle on some sesame seeds.
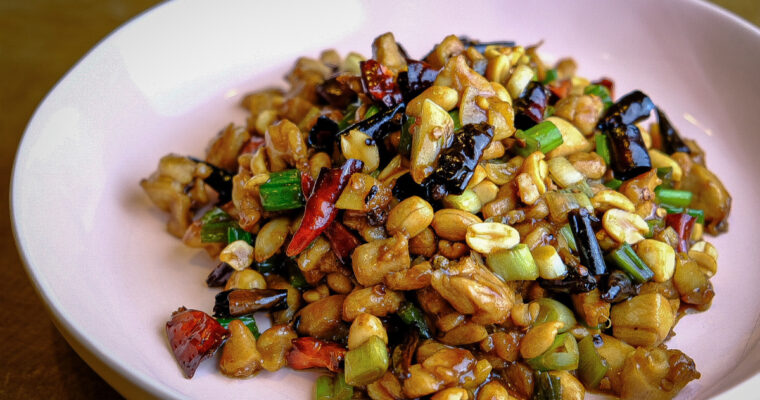
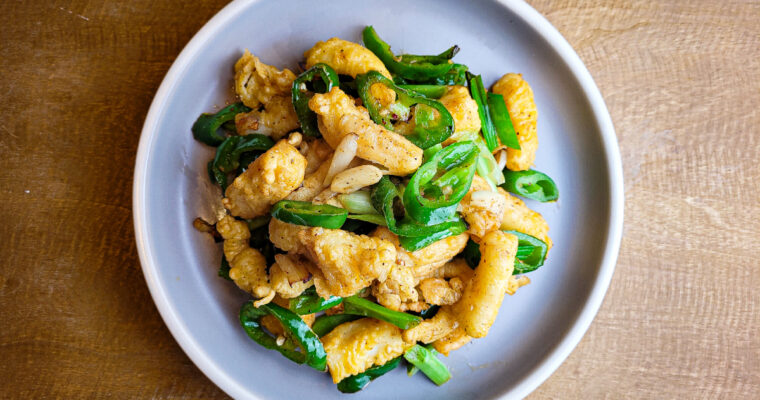
There are a lot of really great Sichuan restaurants that have popped up here in Brooklyn Chinatown over the past few years. I eat at a few of them quite often. Many of these restaurants usually have a menu item that is often titled something …
Kung Pao Chicken is a classic Sichuan dish that is quite popular here in the US. That being said, the versions you often find here tend to lean on the sweeter side and often contain many additional ingredients such as bell peppers or carrots. While …
Soft roasted peppers, sweet confit garlic, creamy burrata, and lightly charred bread. This is a flavor combination that just works. It isn’t avant-garde, it isn’t pretentious, it’s just delicious. I like to make these crostini as an appetizer or a snack to start a dinner party. You can either pre-assemble the crostinis or just set out the bread, burrata, and pepper condiment so your guests can make their own.
The pepper condiment used in this recipe is quite versatile and will keep for 4 or 5 days in the refrigerator. I suggest making a double batch as you can easily use it throughout the week in different applications. Folded into pasta, on fried eggs for breakfast, straight onto some crackers…all great options. This recipe can be made with any crusty bread you have on hand and the burrata can easily be replaced with ricotta that has been seasoned with a little olive oil, salt, and pepper.
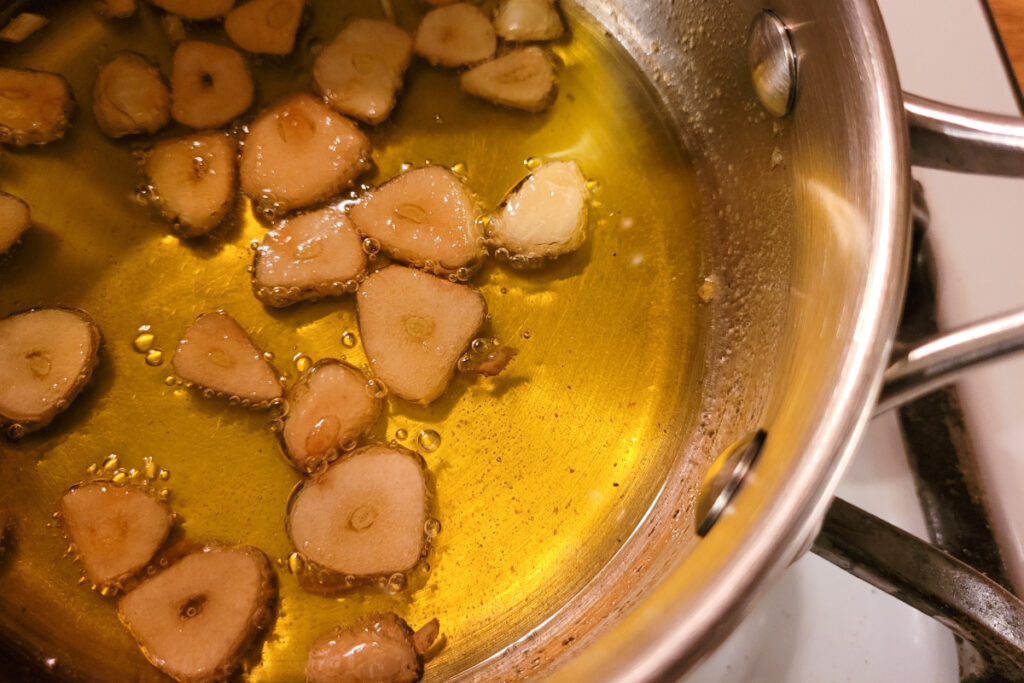
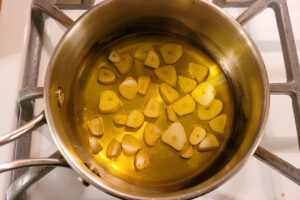
The garlic is cooked in olive oil over very low heat until soft and sweet.
Roasted peppers
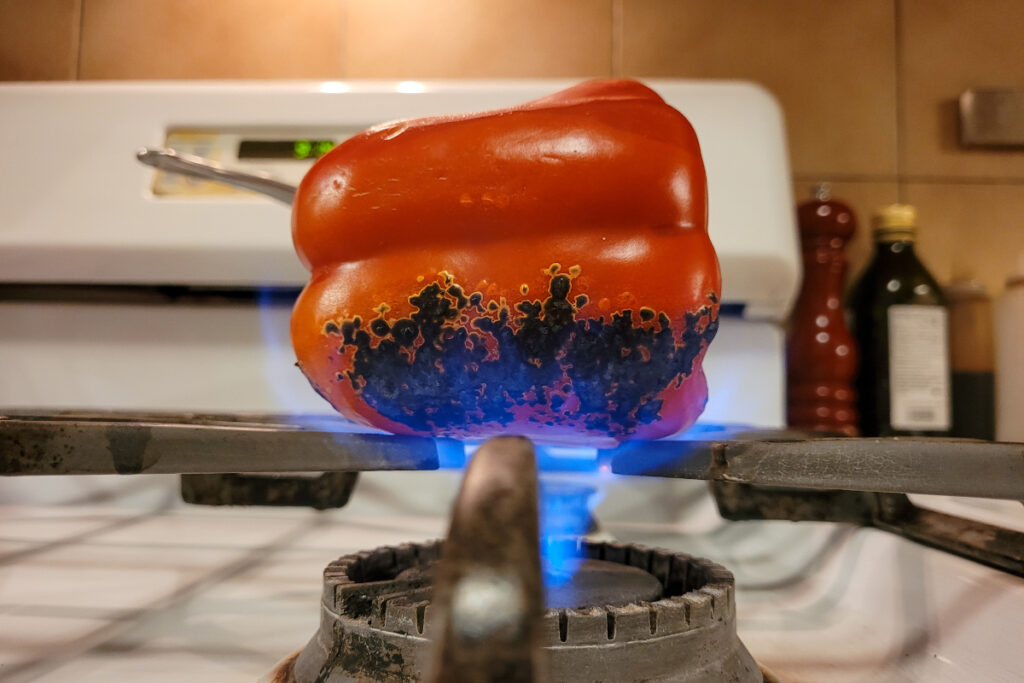
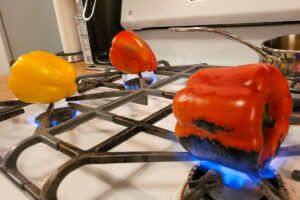
The peppers can be roasted on a gas stove, a very hot grill, or under the broiler in your oven. The trick is to apply intense, direct heat so that the pepper skins start to burn and char. I like to cook the peppers directly over the flame on my gas stove. As the peppers char, rotate them until the peppers are completely covered in a layer of charred skin. Be careful not to leave the peppers on the flame too long as you could start to burn into the flesh. If your burner allows it and it is safe to do so, you can also remove the cap of your burner and use the resulting jet of flame to roast the pepper. This makes it a little easier to evenly roast each pepper as the flame will be centered and surround the pepper as it cooks. You may need to use a lighter to ignite the gas as the electric starter will not work. The peppers can also be charred over a very hot grill or directly under a hot broiler.
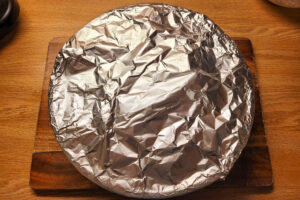
When each pepper is finished charring on all sides, immediately place it into a heat-safe container and cover it tightly with foil. Once all of the peppers are in the container, keep them covered tightly for at least 15 minutes. The steam that builds up in the container will continue to cook and soften the peppers as well as loosen up the skins. After 15 minutes, open up the container and use a kitchen towel or some paper towels to rub off the charred skins. Don’t worry if some specks of charred skin are left behind, this will give a bit of flavor and character to the peppers. Do not be tempted to wash the peppers under running water, you would just be washing away that pleasant smokey flavor. The peppers are now ready to be seeded and cut.
Removing the cover of your gas burner is an efficient, but optional way to roast the peppers.
1head garlic(reserve one clove for rubbing the grilled bread)
1/2cupextra virgin olive oil, plus additional for cooking the bread
3 bell peppers(red, yellow, orange, or a combination)
1 shallot
salt
1.5Tbspsherry vinegar or red wine vinegar
To Serve:
4-8oz fresh burrata
2-4thick slices rustic bread such as sourdough(about 3/4 inches thick)
6-7basil leaves, save the stems to cook with the peppers
Instructions
Pepper and Garlic Condiment
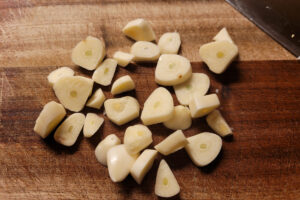
Peel all the garlic cloves. Reserve one clove for rubbing onto the grilled bread, and cut the rst of the cloves into 1/4 inch thick slices. You should yield about 1/3 to 1/2 cup sliced garlic.
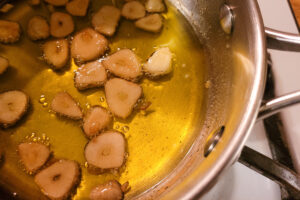
Place the sliced garlic into a small pot with 1/2 cup of olive oil. Bring up the temperature over low heat until garlic starts to bubble gently. Cook at low heat for about 25 minutes or until the garlic has softened and is getting very light golden in color. Do not let the garlic get too dark. Use the weakest burner on your range if necessary to maintain the garlic at a gentle bubble without getting too hot.
While the garlic is gently simmering. Roast the peppers. if the garlic is soft and golden brown before you are finished with the peppers, turn off the heat to the garlic.
To roast the peppers, place each pepper directly over a burner on your stove and turn the heat to high. Cook the peppers directly over the flames so that the skins burn and char. Turn the peppers as they cook until they are completely covered in burnt, charred skin. Don't let the peppers cook for too long after the skin has burnt or you may burn into the flesh. This will not work on an electric stove, you can alternatively use a very hot grill or place the peppers very close to the broiler in your oven.
When each pepper is finished charring on all sides, immediately place it into a heat-safe container and cover it tightly with foil. Once all of the peppers are in the container, keep them covered tightly for at least 15 minutes.
After 15 minutes, open up the container and use a kitchen towel or some paper towels to rub off the charred skins. Don't worry if some specks of charred skin are left behind, this will give a bit of flavor and character to the peppers. Do not be tempted to wash the peppers under running water, you would just be washing away that pleasant smokey flavor.
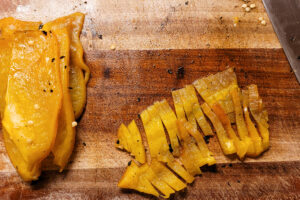
Remove the seeds and stem from each pepper and cut the pepper into roughly 1.5-inch sections. Slice these sections into 1/8 inch strips.
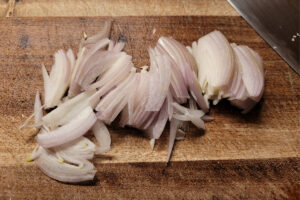
Thinly slice one shallot.
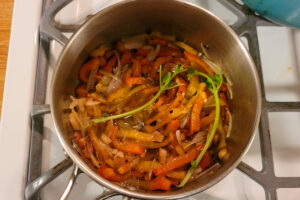
When the garlic is finished cooking, add the sliced shallot and sliced peppers to the pot with the cooked garlic along with 2 Tsp, kosher salt, and the reserved basil stems.
Simmer everything together over medium-low heat for about 15-20 minutes, stirring occasionally. Discard the basil stems and add the 1.5 Tbsp vinegar to the pot. Turn off the heat and allow the condiment to cool to room temperature. Adjust seasoning with additional salt and vinegar if desired.
To serve
Break up the burrata in a bowl with a spoon.
Season the burrata with a splash of olive oil, salt and pepper to taste. Set aside.
Brush the slices of bread with olive oil and cook on a hot grill or a hot cast iron pan until lightly charred on both sides.
Rub the grilled bread with the reserved raw clove of garlic so that it gently "grates" a little garlic into the bread. Cut the bread into whatever size or shape crostini you desire.
Top the bread with the seasoned burrata, pepper condiment, and torn or chiffonade basil leaves.
If you have never had Chinese-style steamed eggs (or its Japanese counterpart, chawanmushi), it is best described as a savory egg custard. In this version, eggs are whisked together with stock and some seasonings and then steamed until a soft custard has formed. This custard …
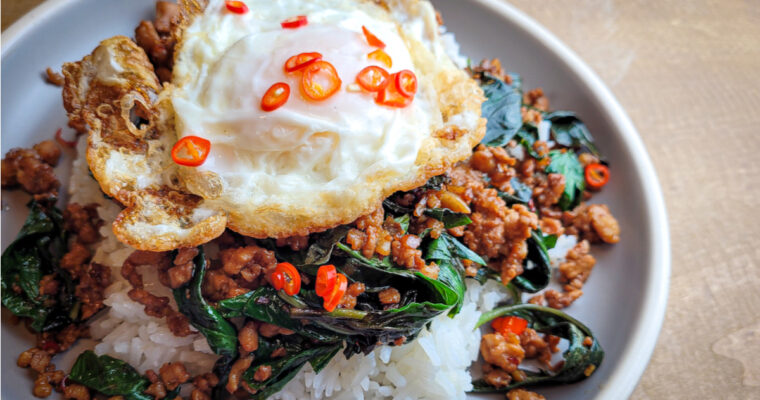
Pad Ka Prao is one of my favorite one-dish meals. It is simple, quick to throw together, and absolutely delicious. Minced meat (usually chicken, but you could do this with almost any protein) is stir-fried with basil, garlic, chilies, and fish sauce. This salty, savory …
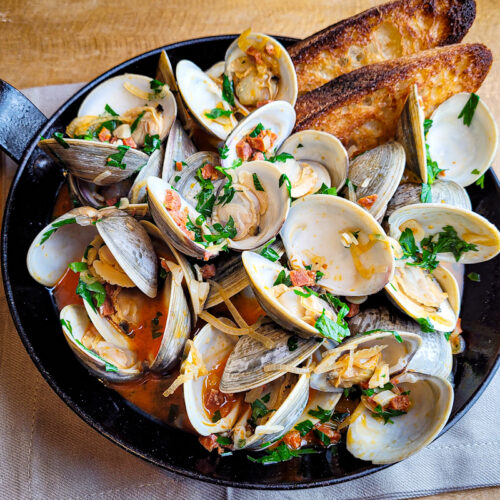
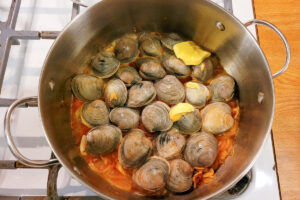
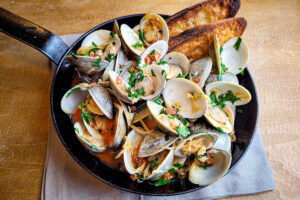
There are few things more delicious on a cold day than a pot of freshly steamed clams served with warm, crusty bread. As a matter of fact, steamed clams are great regardless of the weather. In the summer, I love eating them outside while enjoying a cold bottle of fresh white wine such as txakoli. This recipe is simple to throw together and will most certainly impress your friends and family.
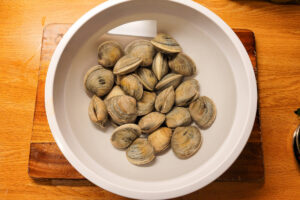
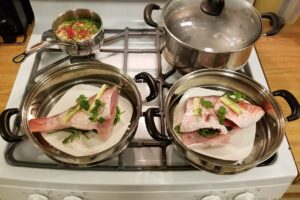
Steaming the clams.
Clams
The term littleneck simply refers to one specific size of Quahog clam (AKA hard clam). There are many sizes of Quahog clam including littleneck, middleneck, topneck, cherrystone, and chowder (from smallest to largest). For steamed clams, I would recommend using the smallest clams available to you. Larger clams are typically tougher.
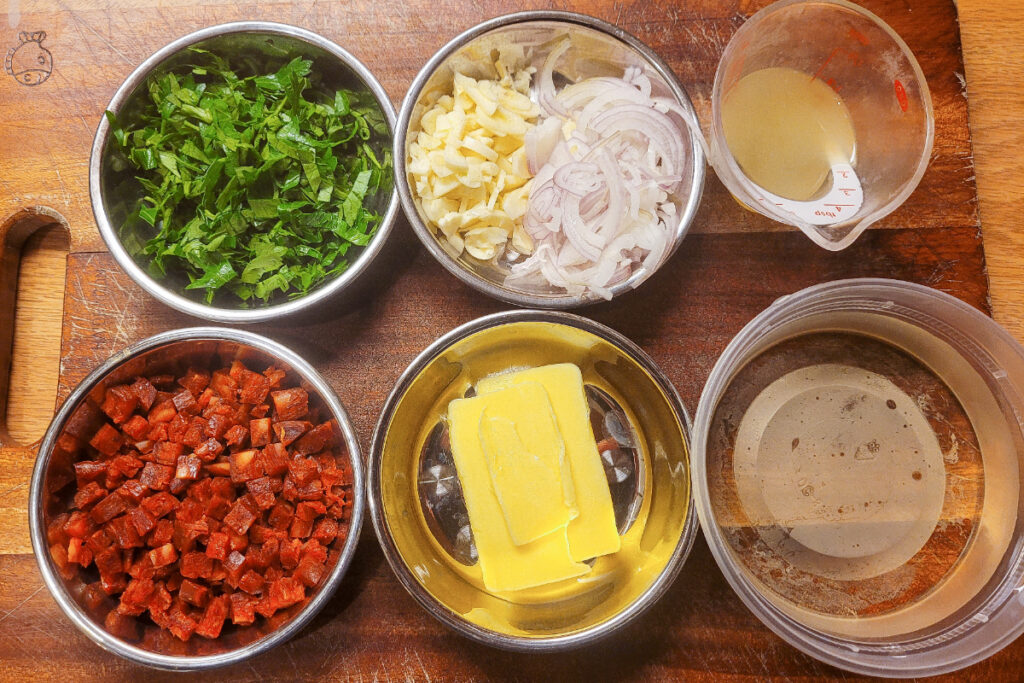
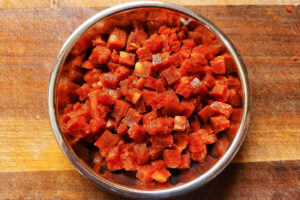
Chorizo
Chorizo is a term that can also get a bit confusing. Broadly speaking, there are two main types of chorizo, fresh and dry-cured. Fresh chorizo is very popular in central and south America and as the name implies, it is sold fresh and then cooked by the consumer. The dry-cured variety is most popular in Spain and more closely resembles a salami. It is seasoned with lots of paprika, cured and dried for several months and can be served uncooked or cooked in many recipes. In this recipe, we will be using a Spanish dry-cured chorizo but you could easily substitute fresh chorizo or any other type of cured pork product such as soppressata, bacon, pancetta… The only thing I would avoid is the pre-cooked “fresh” chorizo that is often found at the supermarket. It is usually of low quality and does not work well in this recipe. If you purchase fresh chorizo, make sure it is uncooked.
Spanish, dry-cured chorizo.
Variations
Steamed clams can be prepared in countless different ways. Here are a few adjustments that you can make to this recipe in order to change it up a bit:
Add thinly sliced fennel or leeks along with the shallots and garlic.
Use a pilsner or other light-colored beer instead of white wine to steam the clams.
Cut the chorizo a bit bigger if you prefer larger chunks
Add a pinch of saffron to the cooking liquid
Use a bit less butter if you are preparing this dish in the summer, it will yield a lighter broth. Alternatively, use a bit more butter to make it even more rich and luxurious.
Use lime juice instead of lemon.
The ingredients used in this version of the recipe.
1.5ouncesdry-cured Spanish chorizo(about 1/3 cup after dicing)
3 Tbspchopped garlic
1 medium-sized shallot, thinly sliced
1/3cupdry white wine
3 Tbspunsalted butter
3-4Tbsprough chopped parsley or cilantro
2Tbsplemon juice
a few slices of toasted baguette or sourdough for serving
Instructions
Wash the clams by agitating them in a bowl of cold water. Pour off the dirty water and cover the clams in clean, cold water for at least 15 minutes, or up to an hour, while preparing the rest of the ingredients. This will help the clams spit out (purge) some of the sand that is in their digestive system.
Cut the chorizo into a small dice (1/4 inch).
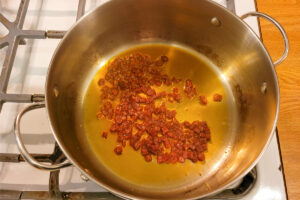
In a pot with a lid that will comfortably hold the clams, heat up 1/2 Tbsp of olive oil over medium-high heat. Add the diced chorizo and cook for about 45-60 seconds, or until starting to change color and the fat begins to render into the olive oil.
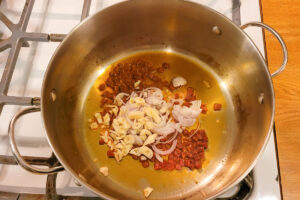
Add the garlic and sliced shallot to the pan.
Cook the garlic and shallots while stirring for about one minutes or until they start to soften up but are not browning
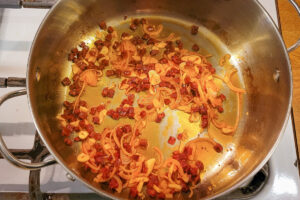
Drain the clams from the water they were soaking in and add them to the pot along with the butter and white wine.
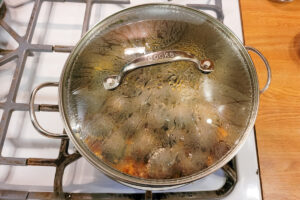
When the wine comes up to a simmer, immediately put the lid on the pot and turn the heat to medium. Cook the clams at a simmer for about 4-7 minutes, or until all of the clams have opened up.
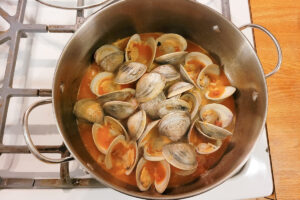
Check to make sure all of the clams have opened up. If you notice a clam open and it is full of mud, carefully discard it as soon as possible before it contaminates the broth. If there is an off-smell coming from the pot, one or more of your clams may have been bad, try to isolate and discard them if possible.
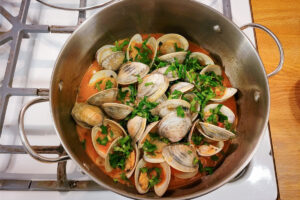
Add the lemon juice and parsley/cilantro to the clams and give them a quick stir.
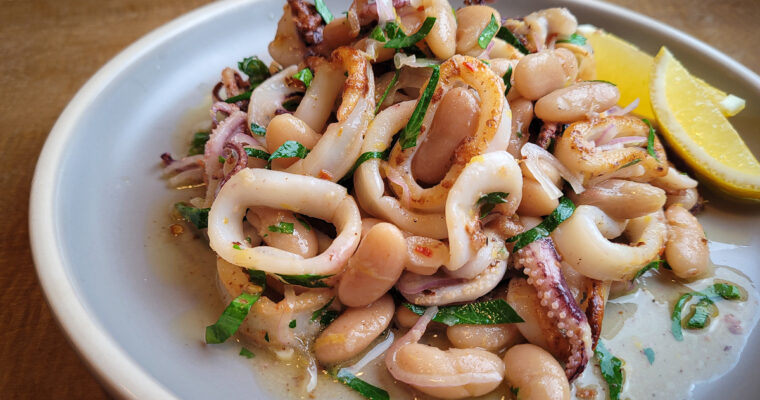
This is an impressive side dish that is easy to throw together and very customizable. Fresh squid is marinated in olive oil, garlic, and chili flake and then “grilled” in a very hot pan. The calamari is then tossed with beans, olive oil, lemon, parsley, …
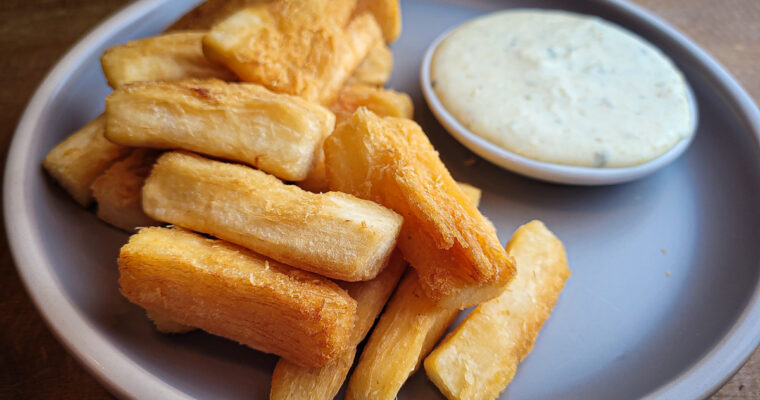
If you have ever attempted making potato french fries at home, you probably know how difficult it can be to achieve a super crispy fry with a soft, fluffy center. I know many chefs who have spent countless hours going through multiple steps of soaking, …
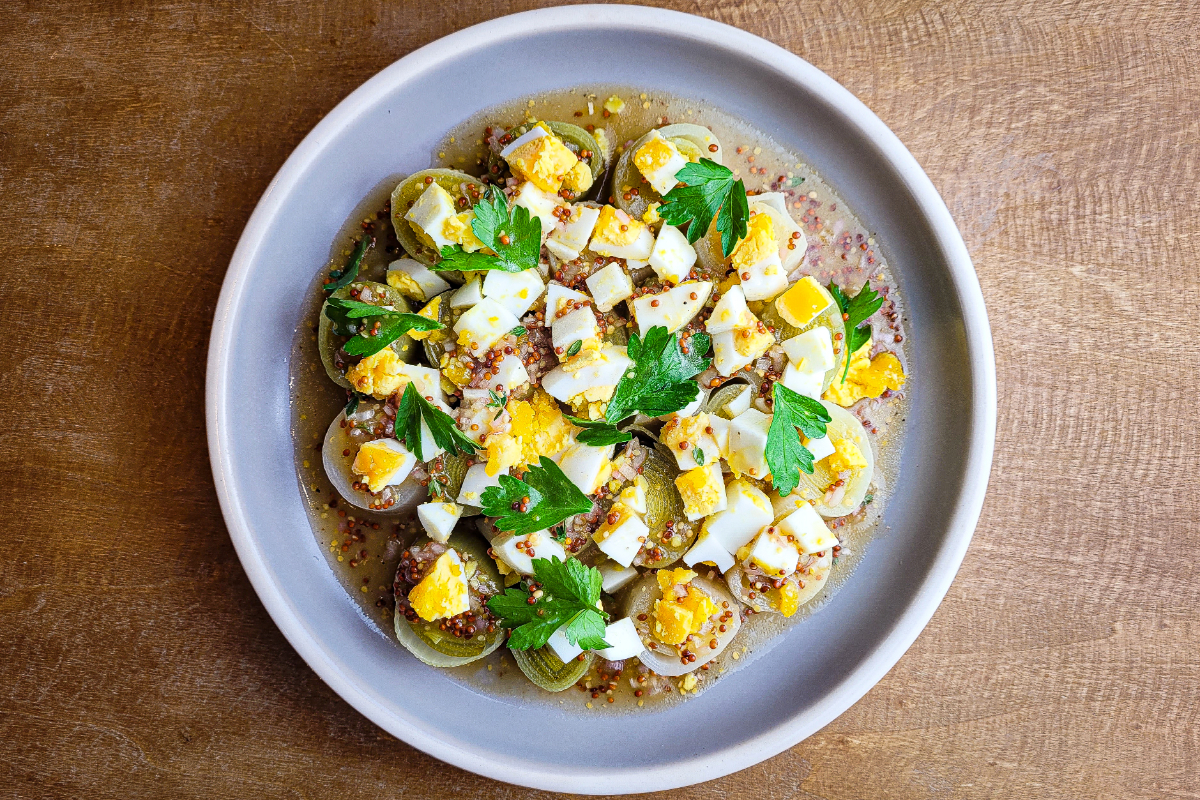
This classic french dish is one of my favorites to prepare at home. Leeks are poached until meltingly tender, garnished with hard-boiled eggs, and then marinated in a mustardy, bright vinaigrette. This dish works very well as an appetizer or side dish and I love it as an accompaniment to steak-frites or a simple roasted chicken. The secret is to make sure you cook the leeks until they are super soft, sweet and tender. If the leeks are undercooked they can have a harsh onion flavor and the texture won’t have the same luxurious quality.
Making this dish is very simple. there are only 3 things you need to do… cook the leeks, boil and chop the eggs, and make the vinaigrette.
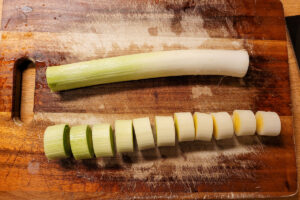
The leeks in this dish are often split lengthwise and poached in salted water. They are then cut into long sections and served as is. While this is a great, simple way to serve them, in this recipe we will be cutting the leeks into rounds for a slightly different presentation. Just be sure to rinse away any dirt or sand you come across while cutting the leeks into rounds.
2-3 large leeks, white and light-green parts only(need about 2/3# of leek after removing the dark green tops)
2cloves garlic, lightly crushed
4small sprigs thyme
2/3cupdry sherry or white wine
salt to taste
water, as needed
Vinaigrette
1.5Tbspminced shallot
1.5tsphoney
1tspsmooth dijon mustard
1 Tbspgrainy dijon mustard
3Tbspchampagne vinegar or white wine vinegar
3Tbspextra virgin olive oil
scanttsp kosher salt (use less if using table salt)
1/2tspfresh picked thyme leaves
fresh black pepper, as needed
Garnishes
2peeled, hard-boiled eggs, cold or room-temp
a few picked parsley and/or tarragon leaves for garnish(optional)
pinch ofcrunchy finishing salt such as fleur de sel.(optional)
Instructions
Poaching the leeks
Rinse the leeks well, remove any outer layers if they are damaged, and slice them into 1/2 inch rounds. You should have roughly 2/3 pound of leek rounds. As you are slicing the leeks, you may notice some sand in between the layers, particularly closer to the light green parts. If you see any bits of soil or sand, try to rinse it away while keeping the leek rounds intact.
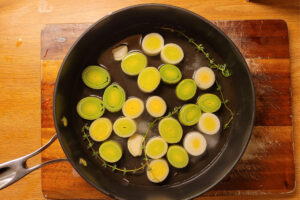
Place the leek rounds in one layer at the bottom of a sautee pan that has a lid. Make sure they are flat against the bottom of the pan. Add the 2/3 cup sherry/wine, 2 cloves crushed garlic, and 4 sprigs thyme to the pan. Add enough water to barely cover the leeks without letting them float around too much.
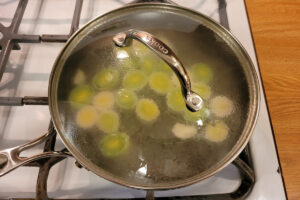
Place the pan over medium-high heat and bring to a simmer. Once the liquid comes to a simmer, add a pinch of salt to the cooking liquid and allow it to dissolve. Taste the cooking liquid and adjust the seasoning of the cooking liquid until it is pleasantly seasoned, not salty. Cover with a lid, turn the heat down to maintain a gentle simmer, and cook for 15-20 minutes
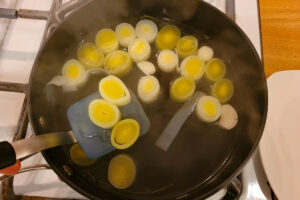
After 15-20 minutes, taste one of the leek rounds, it should be very tender, if not, keep cooking. When the leeks are tender, carefully remove them from the poaching liquid using a spatula. Put them on a plate and place in the refrigerator until completely cool.
Vinaigrette
Whisk together everything but the olive oil. After everything is combined, slowly drizzle in the olive oil while whisking in order to emulsify it into the vinaigrette. Check seasoning by tasting the vinaigrette with a little bit of leek, adjust if necessary. Set vinaigrette aside.
Assembly
Chop the 2hard-boiled eggs into roughly 1/4 inch pieces. season them with a pinch of salt and some fresh black pepper.
Transfer chilled leeks to a serving plate and sprinkle with a pinch of the finishing salt. Top with chopped egg and picked parsley/tarragon leaves. Spoon the vinaigrette over everything so that it soaks into every piece of leek. Allow everything to sit for 5 to 10 minutes before serving to allow the vinaigrette to infuse into the leeks. This dish can be prepared well ahead of time and will even taste great the next day.
If you are like me and you love fried calamari, you will also love this dish. Think of it as the meatier, more substantial version of fried calamari. If you are not familiar with cuttlefish, it is in the same class as squid and octopus. …
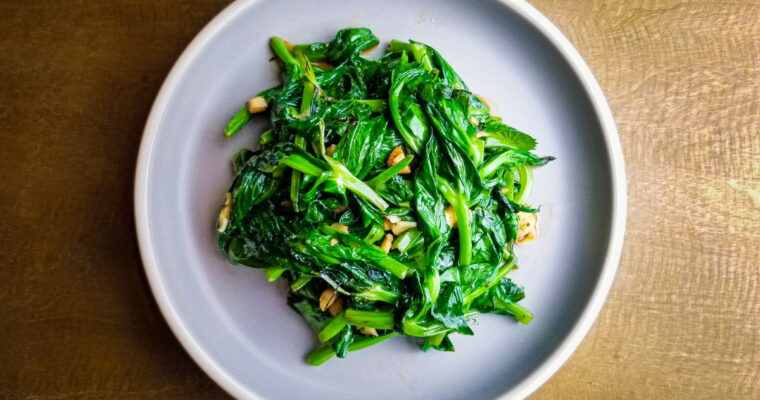
Stir-fried pea leaves with garlic is one of those dishes that I will almost always order from a Chinese restaurant menu. The dish is about as simple as it gets and needs very little explanation. Tender pea leaves are stir-fried over high heat with sliced …
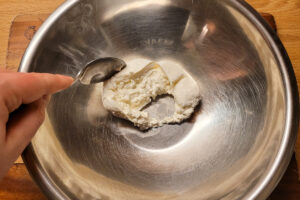
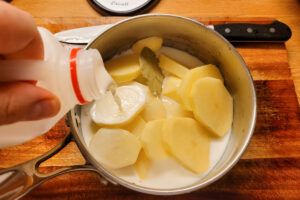
Brandade de morue is one of my favorite things to eat with grilled bread. There are many variations of this dish but at its core, it is a spread made from salt cod, olive oil, and potato. The version that I like to make also includes garlic, a bit of milk, bay leaf, and thyme. All of these ingredients come together to make a warm garlicky potato spread that is infused with the flavors of salt cod and a generous quantity of olive oil. The spread is broiled until the top is golden and then served with some nicely grilled or toasted bread.
Salt Cod
Salt cod is cod (AKA morue) that has been heavily salted and dried in order to preserve it. As a result, it needs to be soaked in a few changes of water for at least a day in order to reduce the salinity and soften up the fish. While this is very easy to do, it does mean that you have to plan ahead. The cod can soak for up to 3 days, but it will get less salty over time so you’ll need to adjust final seasoning depending on how long the cod has soaked.
While you can certainly try to make salt cod at home, I prefer to purchase it . Home-made salt cod will still taste delicious, but the flavor and texture of cod that has been salted and thoroughly dried out (the drying is the tricky part) is better in my opinion. Salt cod can be purchased in many forms…bone-in, skin-on, whole… but boneless, skinless fillet is the easiest to work with. You can buy whichever is available, just remember that you will need to remove the skin and bones if they are present.
A piece of boneless, skinless, salt cod.
Procedure
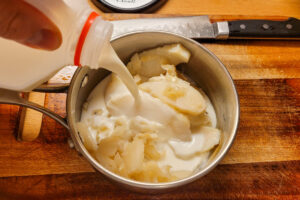
After the cod has been soaked, making the brandade is simple. The cod and sliced potatoes are simmered (separately) in milk. When the potatoes are tender, they are removed from the milk and crushed. The cod is also removed from the milk and broken up into flakes. The fish and potatoes are mixed together and combined with a bit of the cooking milk, garlic, thyme, and plenty of olive oil. The mixture is then placed in a ramekin, pan, or baking dish and broiled until the top is bubbly and golden.
Serving the brandade
The nice thing about this dish is that the brandade can be made up to three days ahead of time. You can store the whipped potato mixture in the fridge and just pop it in the broiler when you are ready to serve. I like to use a relatively low, flat serving dish when broiling the brandade so that it warms quickly and has a good amount of browning top. You can serve the brandade with anything you like (crackers, crudite…etc.), but I really like it smeared on some slightly charred, grilled bread.
Brandade de Morue
Ian Benites
A warm, garlicky, potato and salt cod spread that is infused with flavor of olive oil.
oven-safe serving dish such as a cazuela, ramekin, or even just a skillet.
fork, potato ricer, or a tamis (for processing potatoes)
Ingredients
200grams (7 oz)salt cod, skin and bones removed(see directions below for cleaning salt cod)
750grams (26oz)peeled russet potato(about 2 large potatoes)
about 1.5liters (1.5 quarts)whole milk
15gramspeeled garlic(3 large cloves)
130grams (5 oz)extra virgin olive oil
1/2Tbsppicked fresh thyme leaves
1bay leaf
salt as needed
grilled or griddled bread, for serving
Instructions
Soaking the salt cod
Examine the salt cod and see if there is any skin or bone that needs to be removed. Here I am using cod that is already boneless and skinless.
Even if you are using boneless, skinless salt cod, there may still be some silverskin and bloodline that should be trimmed off. Use a knife to remove as much as possible. If you miss some, dont worry, you can always pick out any that remains after you have cooked the fish. You want to yield 200 grams (7 oz) of cleaned fillet before soaking.
Slice the cod into roughly 1/2 inch slices. This step is not necessary but it will speed up the rate at which salt is extracted from the cod.
Place the cod in a container and cover generously with cold water. Make sure you use at least 2-3 cups of water. Allow the cod to soak in the refrigerator for 24-72 hours. Change the water 2-3 times throughout the soaking process. The longer you soak, the more salt you will need to add back into the finished brandade.
Making the brandade
Finely grate the garlic using a microplane. Alternatively, you could grind the garlic into a fine paste in a mortar and pestle OR use a knife to finely mince the garlic and use the side of the knife to "smear" the garlic into a fine paste.
Add the olive oil to the garlic and set aside.
Cut the peeled potatoes into 1/2 inch slices and place in a bowl of water to rinse off excess starch. Let them sit for a minute or two.
Remove the sliced potatoes from the water and place in a pot with the bay leaf and enough milk to cover them.
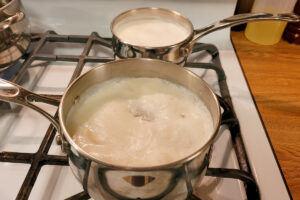
Drain the salt cod from the soaking water and place into a separate pot with enough milk to cover the cod.
Bring both pots up to a gentle simmer over medium-low heat and allow them to simmer. The salt cod will simmer for 10 minutes and the potatoes will cook for about 10-15 minutes, or until they are tender when pierced with a knife.
After simmering for 10 minutes, strain the cod and reserve the hot milk. ***If the potatoes are done cooking at this point, just turn off the heat and let them sit in the hot milk until you are done processing the salt cod. You don't want the potatoes to cook to the point of completely falling apart and dissolving into the milk.***
Place the drained cod in a bowl and spread it out so it cools quickly. You can put the bowl in the fridge for a minute or two to speed this up.
Once cool enough to handle, break the cod into small pieces by rubbing and squeezing it with your (clean) hands. If there were any bits of skin, bone, silverskin, or bloodline, now is the time to remove them.
The cod should be finely broken up and resemble threads. Set the cod aside.
When the potatoes are tender, strain them from the hot milk and discard the bay leaf. Reserve the hot milk and combine it with the milk that was used to cook the cod.
You have a few options for processing the potatoes. You can either pass them through a potato ricer, pass them through a tamis, or just crush them with a fork until relatively smooth. Here I am crushing them with a fork. Whichever method you choose, make sure you process the potatoes while they are still hot so that they do not get gummy.
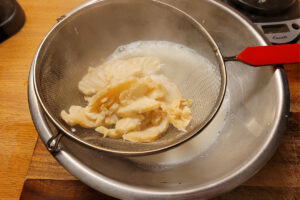
**OPTIONAL STEP** If you crushed the potatoes with a fork, you can then press the potatoes through a medium-fine meshed strainer with a rubber spatula to work out any lumps. This step is optional but will yield a smoother brandade. Again, make sure you do this while the potatoes are hot.
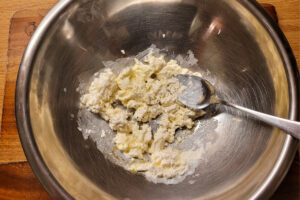
Combine the warm potatoes and cod in a mixing bowl.
Measure out 4 oz (120 grams) of the reserved cooking milk and discard the rest. Add the 4oz milk, the garlic/olive oil mixture, and the picked thyme leaves to the bowl with the cod and potatoes. Mix everything together. The brandade should resemble the texture of mashed potatoes. Taste the brandade and add salt as necessary. The amount of salt necessary will vary depending on the salinity of your salt cod. It should be seasoned well… slightly saltier than normal mashed potatoes.
At this stage you can store the brandade in the fridge for up to 3 days.
When you are ready to serve, spread the brandade in the bottom of an oven-safe serving dish, ramekin or skillet. Don't spread the brandade in a layer any thicker than 1 inch. In this photo, I only used about half of the brandade that I made and saved the rest for later.
Place the brandade under the broiler and cook for about 5 minutes or until the brandade is warm and golden on top. **see note below regarding cooking time**
Drizzle the brandade with a little more olive oil if desired and serve with grilled/griddled bread.
Notes
**The cooking time will vary depending on your specific broiler but you may need to adjust the heat/distance from the broiler so that the brandade doesn’t brown before the inside is warmed up**
Thai-style roti is a very common street food found throughout Thailand. Vendors stretch and cook these flaky treats in alleys and markets all over the country. The crispy flatbreads are often filled with a variety of sweet or savory fillings, but are also eaten plain, …
When most Americans talk about egg salad, they are usually referring to that classic mixture of chopped hard-boiled eggs and mayonnaise that is often smeared between two slices of untoasted white bread. This is NOT that. In this egg salad, a couple of super-crispy fried …
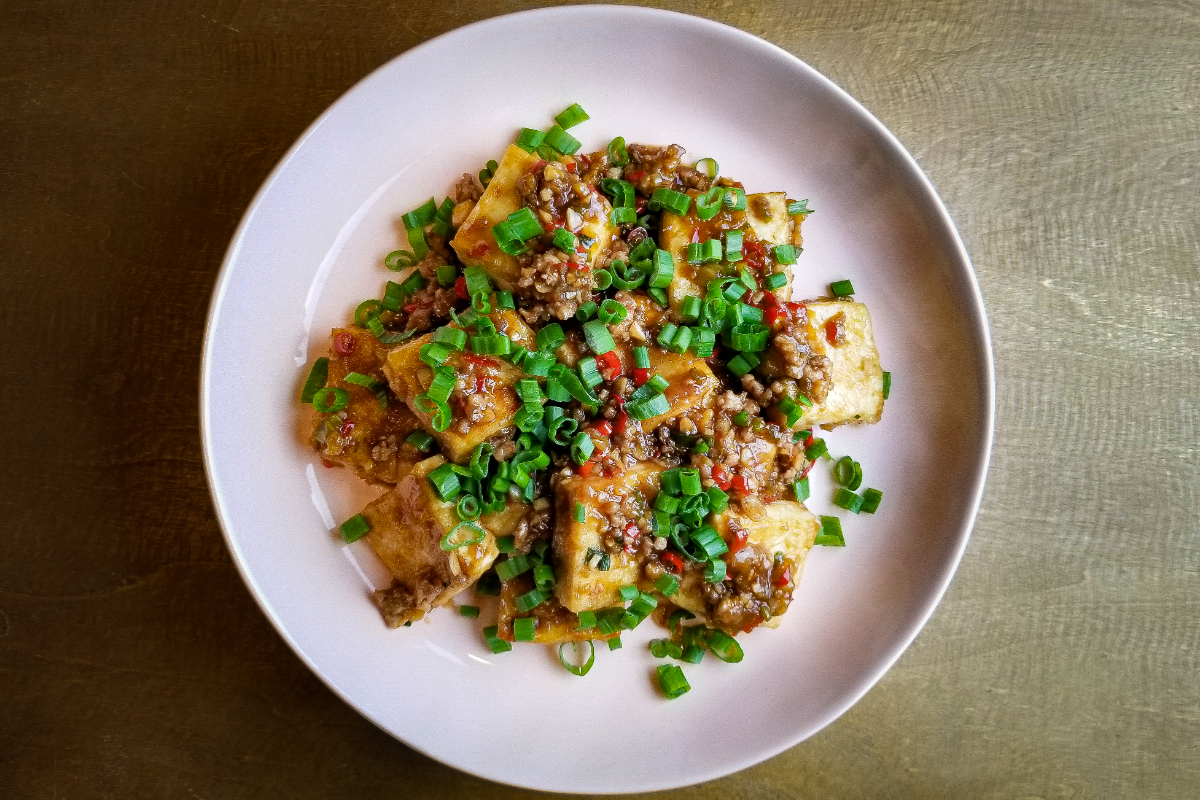
Although braising is typically associated with long, slow cooking of tough cuts of meat, in the case of tofu it usually refers to briefly simmering chunks of tofu in a flavorful sauce. While there are countless braised tofu preparations out there, this is definitely one of my favorites. Everything comes together quickly so it makes a great weeknight dinner with some steamed rice and maybe some stir-fried greens.
Procedure
Preparing this dish is quite simple. Soft tofu is coated in corn starch, pan-fried until a crust forms, and then simmered in a slightly sweet and sour sauce that contains ground pork, garlic, ginger, pickled chilies, soy sauce, and black vinegar. The sauce is more or less in the “fish-fragrant” flavor profile of Sichuan cuisine (no, it does not contain any fish) and therefore goes very well with other Sichuan dishes.
Pan-frying the tofu with a coating of starch gives the finished dish a really pleasant mouthfeel. The starch is initially crispy when it is fried but then it softens when simmered in the sauce. The result is tofu that is completely enveloped in a thin, soft skin that is quite a pleasure to eat. If you prefer more texture, you could coat the tofu in a thicker layer of corn starch by letting the tofu pieces sit in the corn starch for a few minutes before frying. The thicker layer of starch will stay crispy even after being simmered in the sauce.
I used a large cast iron pan to cook this batch but a large wok or saute pan would also work very well.
Ingredients
I like to use soft tofu for this recipe because I think the texture really lends itself to the flavor of the sauce. That being said, you could use any type of tofu you prefer and it will be equally delicious. Soft tofu requires you to be a bit more careful when flipping or stirring the tofu as it can break easily. Medium and firm tofus will be a bit easier to work with.
When it comes to the pork, I like to hand chop a fattier cut like shoulder or belly. I prefer the rustic, coarse texture that you achieve by hand chopping but you could also use store-bought ground pork in a pinch.. If you have a helpful butcher, they may be able to coarsely grind some pork for you … if you ask nicely.
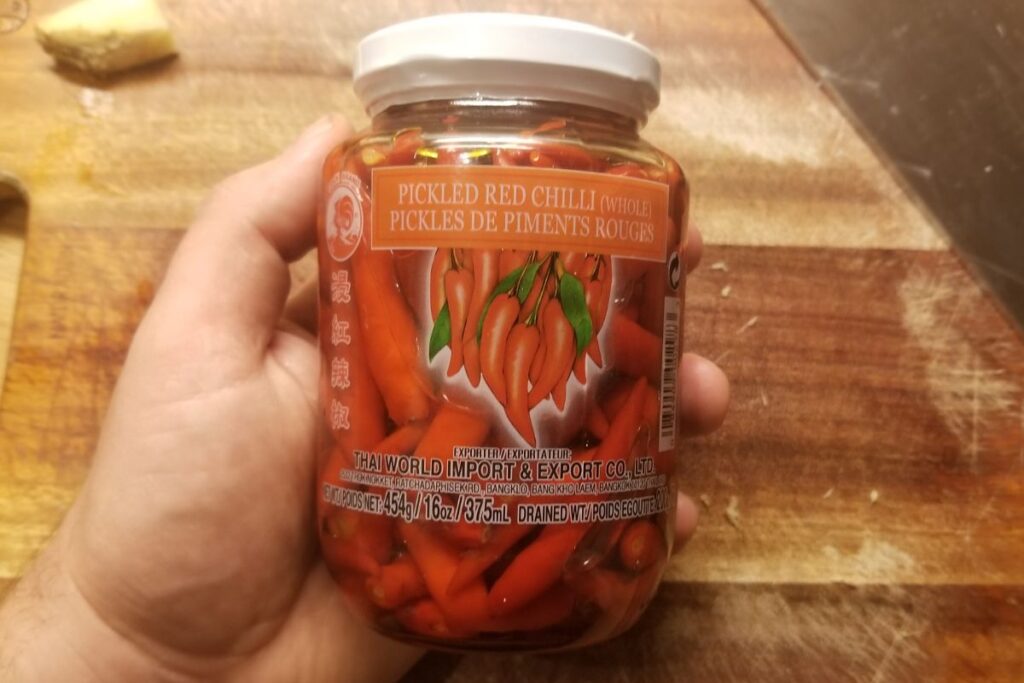
I usually use a Thai brand of pickled red bird chili for this recipe but you could use any other spicy pickled chili for this dish. Just try to avoid overly sweet pickled chilies if possible.
The pickled peppers that I often use for this dish. You could easily make your own or substitute another pepper.
2.5oz piece of pork belly or shoulder(can substitute ground pork)
3 scallions
3-4Tbsp chopped garlic(8 cloves)
1.5Tbspchopped pickled red thai bird chili(about 8 chilies)
2Tbspchopped ginger(about a 1-inch piece of ginger)
1/4tspwhite pepper powder
corn starch, as needed
vegetable oil, as needed
Sauce
2.5Tbspsoy sauce
1TbspChinkiang vinegar AKA black vinegar
1.5Tbspgranulated sugar
7Tbspwater
Slurry
1 Tbspcorn starch
3Tbspwater
Instructions
Slurry
Stir 1 Tbsp corn starch with 3 Tbsp water and set aside.
Sauce
Combine all the sauce ingredients in a small bowl and stir until sugar dissolves. Set aside
Braised Tofu
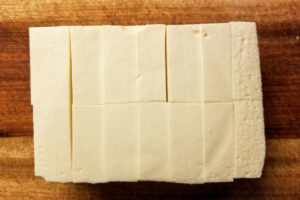
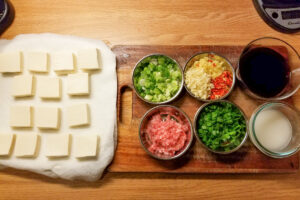
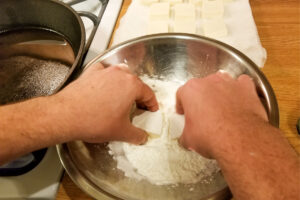
Slice the block of tofu in half lengthwise and then into 14 square pieces
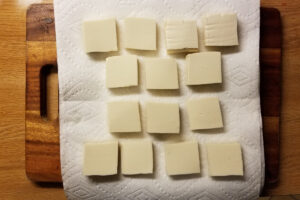
Place the tofu squares on paper towels and cover with a few paper towels to absorb excess moisture. Set tofu aside on the paper towels while preparing the rest of the ingredients.
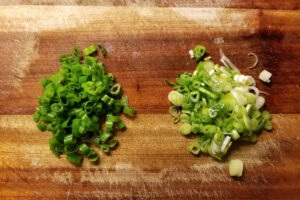
Thinly slice the scallions and separate the whites from the greens. You should yield approximately 1/3 cup of each. Set whites and greens aside separately.
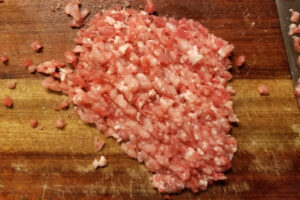
Thinly slice the pork.
Chop the slices of pork to yield a course "ground pork". Set pork aside
Make sure you have all of your ingredients cut and measured before beginning to cook.
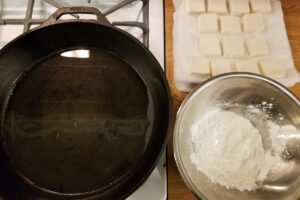
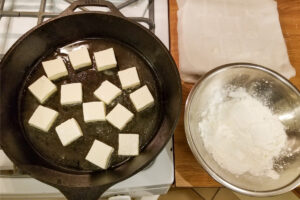
Heat a large flat saute pan or wok over medium heat and add a thin layer of oil. Fill a bowl with about a cup of corn starch and keep it near the pan that is warming up.
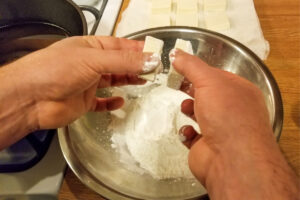
When the oil is hot, carefully dunk two pieces of the tofu into the corn starch, flipping them and coating both sides with starch. Be careful as the tofu is very delicate and will want to break.
Carefully tap the two pieces of tofu together to knock off excess starch.
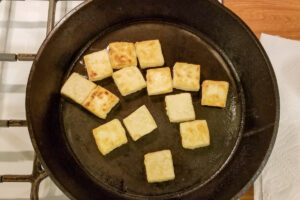
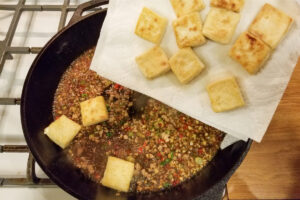
Carefully add the tofu to the hot pan. Repeat this with the rest of the tofu. Cook over medium heat for about 3-4 minutes or until the first side gets golden brown and crisp. Adjust heat as necessary to crisp up the tofu without burning it.
Carefully flip tofu and cook on the other side until golden brown and crispy. Add more oil to pan if necessary.
Remove the tofu from the pan and place on paper towels.
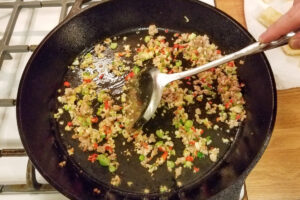
Wipe out the pan with a paper towel and add a bit of fresh oil. Heat over medium to medium-high heat. Add the ground pork to the pan.
Break up the pork and cook for about one minute or until cooked through.
Add the garlic, ginger, pickled chilies and scallion whites (the scallion greens will be used for garnish later).
Cook for about one minute while stirring. Garlic and ginger should soften but not get too much color. If pan is dry, add a touch more oil.
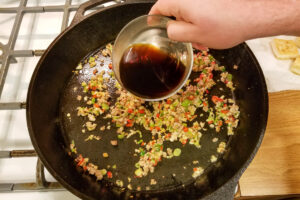
Add the sauce to the pan along with the white pepper.
After adding sauce, immediately add the cooked tofu to the pan.
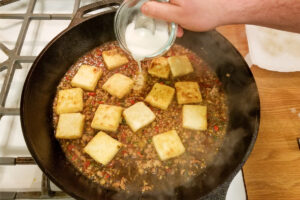
This is now the most crucial point in the cooking process. Simmer the tofu in the sauce for about 30 seconds. If the liquid is reducing too quickly, add a few additional spoonfuls of water to maintain the amount of sauce in the pan. While the tofu is simmering, use a spoon to stir the slurry as the starch will likely have settled at the bottom of the container. Slowly add about 1/4 of the slurry to the pan and gently stir the sauce around to let the slurry mix into the sauce and cook. The sauce should thicken slightly. If the liquid is evaporating too quickly, feel free to keep adding spoonfuls of water to the pan. Add more slurry, little by little, to the sauce until it coats the tofu nicely. You will probably only need to use about half of the slurry. Keep adjusting the sauce by adding slurry and/or water until you get a nice thick sauce that clings to the tofu.
Carefully flip the tofu in order to coat both sides with sauce. Make final adjustments of the consistency of the sauce. Season with additional soy sauce, vinegar, or sugar if necessary.
Place tofu on a plate and garnish with the scallion greens. Serve with steamed rice.
Anyone who grew up near the Chesapeake bay knows how important blue crabs are to the culinary heritage of the region. There are countless ways of preparing them, but the Baltimore-style (or Maryland-style) crab cake is one of the most delicious preparations. While they can …
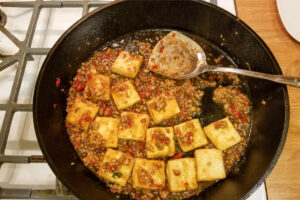
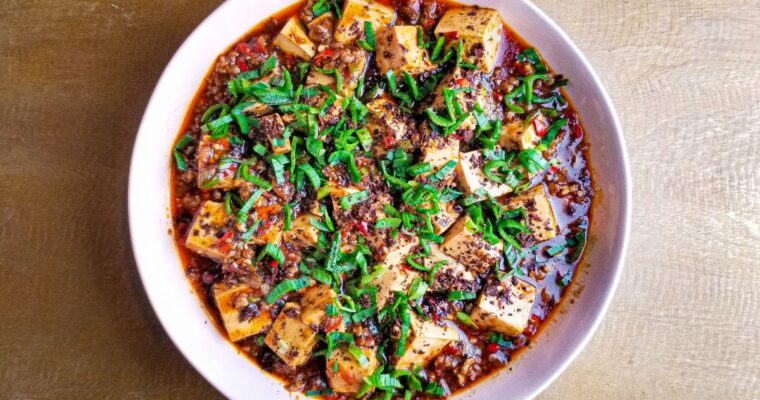
Mapo Tofu is easily one of the most recognizable dishes of Sichuan cuisine. Tender chunks of tofu are bathed in a spicy, meat-studded sauce that makes your mouth tingle as you eat. The tingling comes not only from chilies but from the generous addition of …
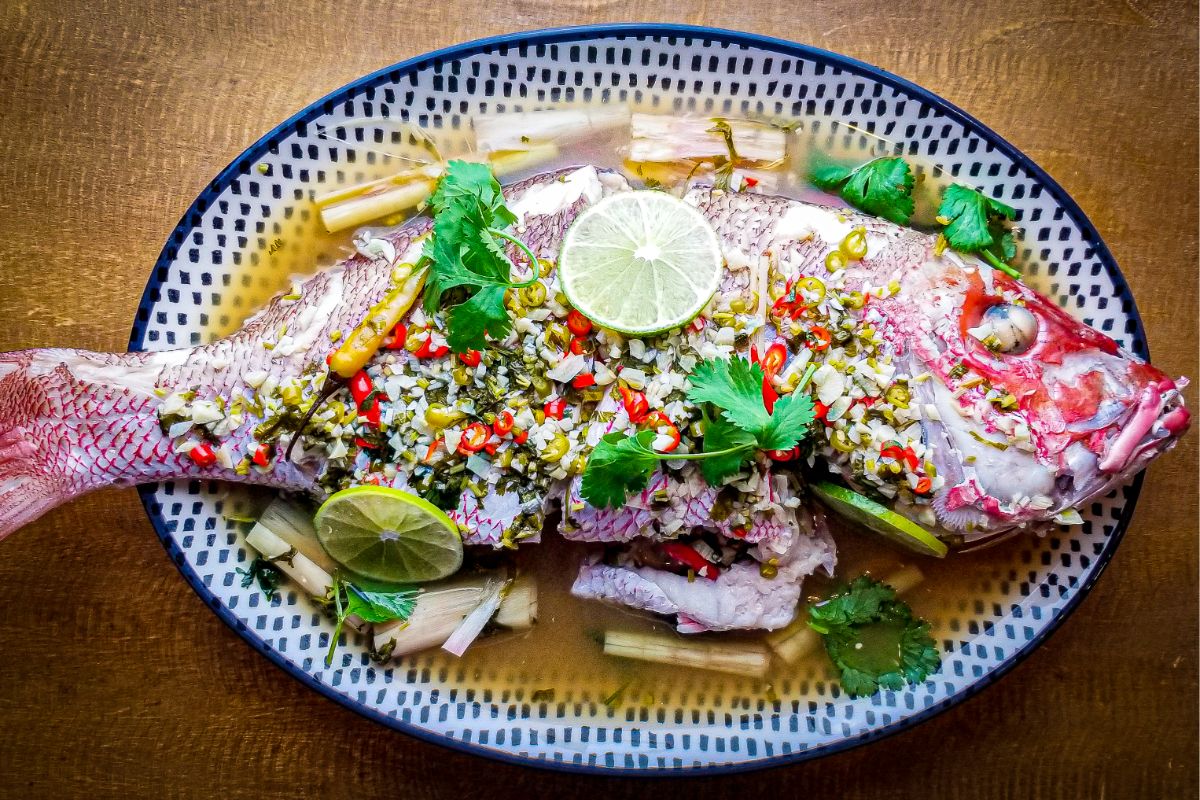
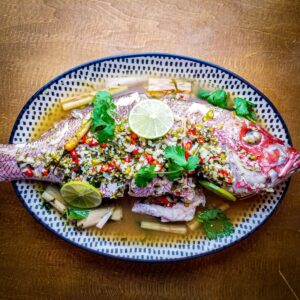
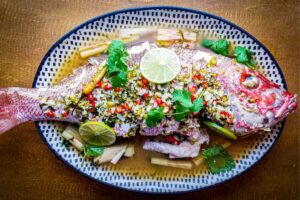
Whenever I see this dish on a menu at a Thai restaurant, chances are that I will order it. It is one of my favorite whole fish preparations and luckily, it is also one of the simplest to make at home. This dish can almost be viewed as two dishes in one…a fish and a soup. There are only two things to cook for this recipe, the steamed fish and the broth, and they can both come together in under 30 minutes. If steaming whole fish sounds intimidating, don’t be discouraged. Steaming is definitely the easiest way to cook a whole fish…WAY easier than grilling or frying.
The fish
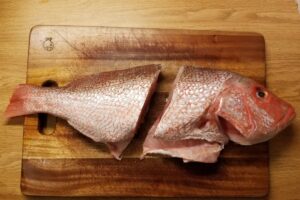
This dish is traditionally made with barramundi but you can use any firm, white-fleshed fish. I used red snapper today, but the same recipe will work with striped bass, black bass, branzino…etc. When you are shopping for fish, ask your fishmonger to remove the fins, scales, and viscera for you. This will make preparation much simpler.
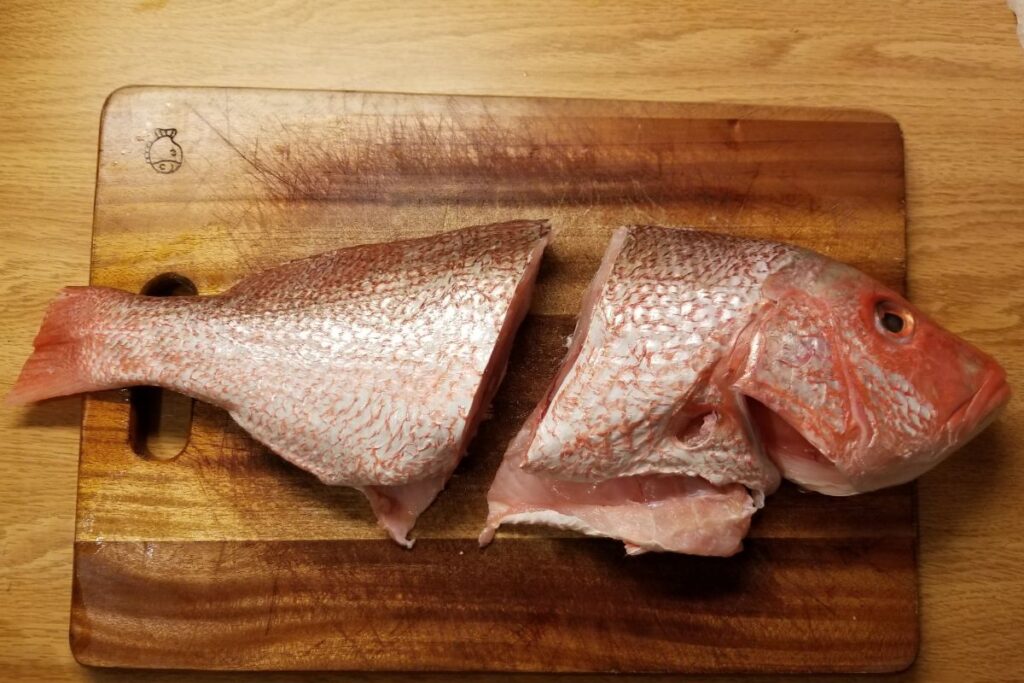
There are countless ways to steam a whole fish, but using a stacking metal or bamboo steamer is by far the easiest way. Most home steamers, however, are not wide enough to hold a whole fish. Don’t worry, there is a solution to this problem. Cut the fish in half! I almost always cut my fish in half and steam the two halves side by side (or on separate “levels” of the steamer). After steaming, the two halves can be put back together on the plate. With a little strategic garnishing, the cut can be easily hidden and no one will know you steamed the fish in two pieces.
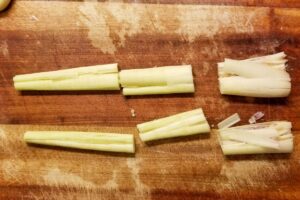
Cutting the fish in half makes it possible to fit a long fish into a standard sized steamer.
In terms of how to cook the fish, the method is quite simple. The unseasoned fish is put on a plate along with some cilantro and bruised lemongrass. The plate is then placed in the hot steamer until the fish is cooked through. In case you were wondering, the broth will take care of seasoning the fish.
The cooking time really depends on the size and shape of the fish but most fish will take around 10-15 minutes. The easiest way to check if your fish is done is to use a fork. Try to move some of the meat near the thickest part of the fish, if the meat easily pulls away from the bones in the center of the fish, the fish is done. Occasionally the bottom fillets (the ones in direct contact with the plate) will take a bit longer to cook. Be sure to check that those fillets are cooked before removing the fish from the steamer. When the fish is finished cooking, place it on to your serving plate and top with your piping hot broth.
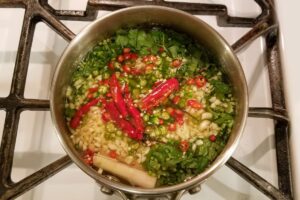
The broth
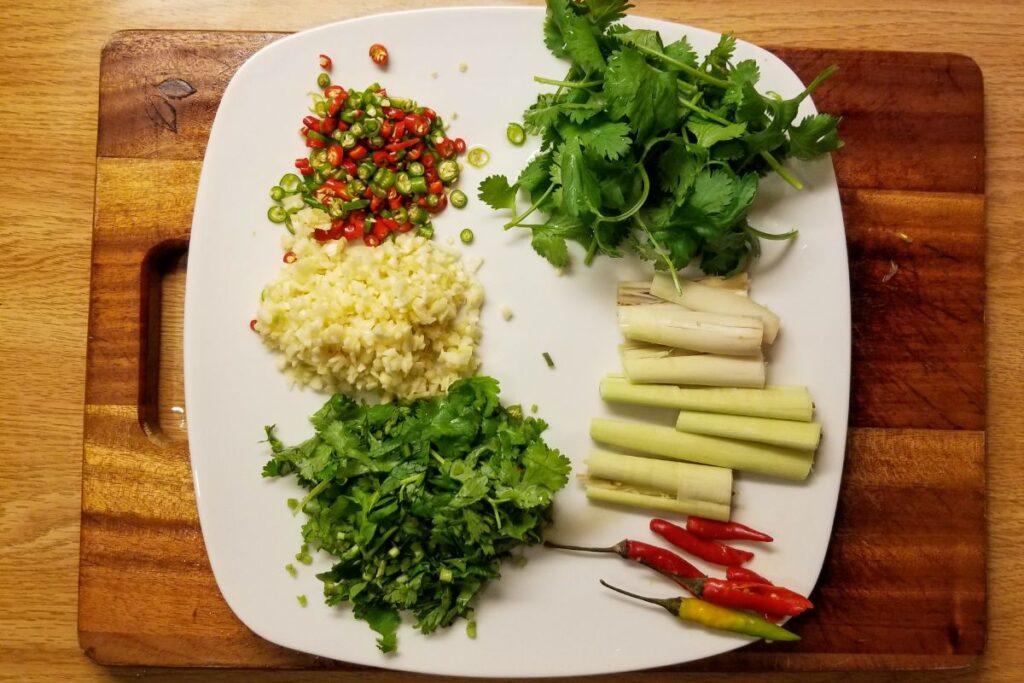
The broth is what makes this preparation really special. It is salty, sour, spicy, garlicky, and aromatic. One of the highlights of eating this dish is drinking spoonfuls of the broth between bites of fish and rice. Making it is surprisingly easy. Chopped garlic, chilies, and cilantro are put in a pot with chicken stock, sugar, fish sauce, and some bruised lemongrass. Everything is brought to a simmer until the sugar dissolves and voila! The broth is done.
The aromatics used in the sauce.
Serving
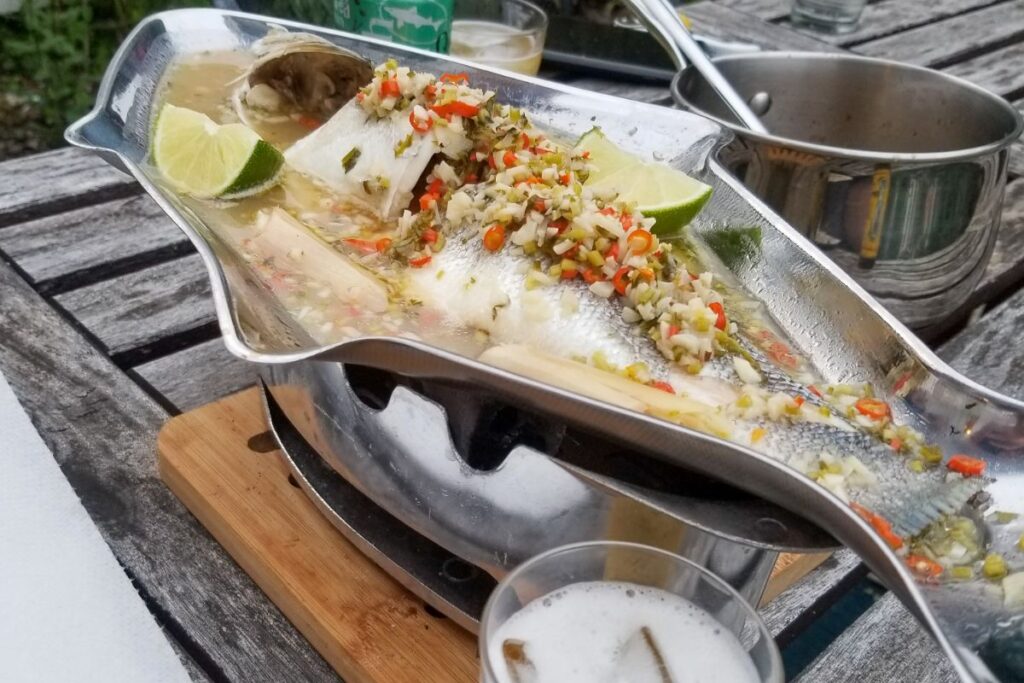
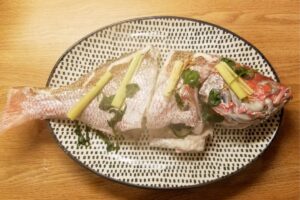
In restaurants, you will often see this dish served on a fish-shaped metal plate that is set over a few pieces of live charcoal. This keeps the broth at a nice simmer while you eat your fish. If you don’t have one of these set-ups, don’t worry, just make sure you warm up your serving plate. Don’t forget to serve this dish with freshly steamed jasmine rice.
Steamed fish served in a hot plate held over charcoal .
1-1.5kilogramwhole white-fleshed fish such as red snapper, striped bass or branzino…scales, fins, and viscera removed(2-3 pounds)
4stalkslemongrass(half will be reserved for making the broth)
4-5sprigscilantro
Broth:
250gramsfresh chicken stock(1 cup)
25gramspalm sugar or white sugar(2 Tbsp)
120gramsfish sauce(1/2 cup)
120gramslime juice(1/2 cup)
60gramsfresh, roughly chopped garlic(15 cloves)
20gramsfinely chopped red or green thai bird chili(about 20 chilies)
35gramsfinely chopped cilantro(1/2 cup)
4-5whole bruised bird chilies(optional)
Garnish:
3 or 4thinly sliced "wheels" of lime
small handfullcilantro sprigs
To Serve:
freshly steamed jasmine rice
Instructions
Steamed Fish
Add a few inches of water to the bottom of your steamer and bring it up to a boil over high heat. Make sure to add enough water so it does not evaporate before the fish has finished cooking.
Warm a serving plate that will hold the fish as well as the broth (about 2 cups of broth)
Remove the outer leaves from the lemongrass, cut it into two-inch sections, and smash the lemongrass to release the aroma. Reserve half of this lemongrass to make the broth.
If your steamer is too small to fit the whole fish, cut it in half. Do not season the fish. The seasoning will be taken care of by the very well seasoned broth.
Place the fish onto one or two plates that will fit inside your steamer. Place the pieces of lemongrass and cilantro under and on top of the fish so that they are in direct contact with the fish. **Here I am using a double-decker steamer but you can also place both halves on the same plate, side by side, if necessary**
Steam the fish over high heat until it is cooked through. This may take anywhere 10 and 15 minutes depending on the fish. Use a fork and try to move some of the meat near the thickest part of the fish. If the meat easily pulls away from the bones in the center of the fish, the fish is done. Check the fillets that are in direct contact with the plate, these can sometimes take longer to cook than the fillets on top.
Place the two halves of the fish on the hot plate. Make sure the broth is finished by the time the fish is done cooking.
The Broth
While the fish is steaming, prepare the broth.
Place the reserved smashed lemongrass, along with the rest of the sauce ingredients into a small pot and bring to a simmer. Allow to simmer for 2 or 3 minutes, and stir to dissolve the sugar. Adjust seasoning if necessary. Sauce should be salty and sour.
Finish the dish
Make sure the broth is done before the fish is finished cooking. Once your cooked fish is on the plate, make sure the broth is piping hot and pour everything over the fish. Garnish with lime wheels and cilantro.
Making fried sweet plantains, AKA “maduros”, is so easy that it feels strange to even write a recipe. As long as you have very ripe plantains, this dish can be put together in under 10 minutes. Here I serve them with a little bit of …